All posts by Gerard

01: What emails goes out when a team applies

When a team applies, these things happen:

1. We write the app data to a text file back up (internal recovery if needed)
2. We send an email copy to the APPS role in your Email Distribution
3. We send a copy of the payment coupon/confirmation to the primary email used in the app
4. We send a text message to the cell number they provide if they checked that (it is checked by default)
5. We feedback the web page with the payment coupon
6. We write the record to the database so you can manage it in your Team Apps Module
7. We send a copy of the email app to our “Big Bucket” gmail account

All of this assumes that some of these will go to spam or be killed off at the receiving email server end.. we can absolutely guarantee we SEND the emails out, but if the sysadmin or ISP of the RECEIVING email server thinks your site is spam, little we can do..

BUT the text message AND the email at least hopes that at least one of these confirmations go through. This might be a bit problematic for a team admin who is submitting multiple apps, one after the other… the algorithms on the RECEIVING MAIL SERVER may assume the first one is good, but the next several are spam because they are a bit identical and coming from the same server in rapid succession….

SOOOOOO… we have a password reminder that will gather all of the apps that were sent by that one password and list the loginIDs … on your front page, right under the login field…

Also, when you send a message to the teams through the Team Apps Module, i.e., to welcome them, remind them payment is due, send an email after you accept them, etc.. whatever your internal processes are — the TeamID along with the team name is on the top of the email so they always have access to that.

AOL, Yahoo, HotMail are all problematic email services as they are grossly unreliable. We encourage you to advise your teams to use a Gmail account when signing up their teams.

02: Broadcast a Message to the Team Applied

In the Team Apps Module, filter to limit the teams displayed, then click on Go! If you want to see ALL the teams, just click on GO!

This is an overview of a team listing.

In order, Check all (or only the desired teams from the list. If you filtered correctly, most of the team will be selected and you will just need to unselect a few, if any.)

Make sure the dropdown menu to the right says Send Email

Enter your email to receive a cc: of the email. This will be sent last and be a listing of all the teams that were sent your message, both primary and secondary contacts.

Add a subject. Note: your tournament moniker will be displayed as EVENT: $subject Try to state the message contents as briefly as possible. Do not use “spammy” language like “Urgent” or “Free” to reduce the possibility your message will end up in a junk folder.

Type your message, using PARAGRAPH HEADERS in ALL CAPS, followed by short paragraphs. Try to limit the call to action to ONE email, but if there are multiples, you may want to state this at the top of the email. This page contains guidelines for effective emails. Here are some sample messages.

Proofread your message.

Proofread again.

Hit send when you are satisfied with your message.

FYI: Emails sent through the Team Apps Module are sent as individual messages (not as a long cc: list!) to both the primary and secondary contact (cc:ed), contain the TeamID login and the Team Name, as well as a disclaimer to use the Contact Page on your website and not reply directly.

03: Quick Application Management

Here is a skeleton recap of things to do IN ORDER to be successful in managing applications.

1. FORMS FOR REGISTRATION
– WebsiteMaintModule>Upload Forms for Registration>GO!
– Review the forms
– Delete what you don’t need
– Upload what you need teams to submit for your registration (liability, concussion, etc)

This is tied to the confirmation process, so it helps to eliminate emails, phone calls, etc if ALL the forms are there BEFORE accepting any teams. Teams won’t come back to download a new form once they have grabbed what they need…

2. MARKING TEAMS PAID
– Team Applications Module>Filter by Fees-Pending>GO!
– Select Fees Paid from the drop down above the teams listed
– Match the teamIDs on your XLS from the treasurer with the teamIDs on the website and place a check in the first column
– At the bottom of the list, big red button Mark Checked Records, click to record the fees paid

3. ACCEPT TEAMS PAID
– Team Applications Module>Filter by Fees-Paid>GO!
– Select All
– Select Accept from the drop down above the teams listed
– Scan to make sure these are teams you really want to accept… uncheck any you don’t
– At the bottom of the list, big red button Mark Checked Records, click to mark the teams accepted

4. SEND AN ACCEPT EMAIL
– Team Applications Module>Filter by Acceptance-Accepted>GO!
– Select All
– Scan teams and uncheck any that have been sent an email prior (you can tell if they have because the M+ in the 4th column will have a number next to it, most likely a 1.
– Scan again to make sure…
– Put your email in the cc: field
– Write the Subject (Your Team Has Been Accepted in the Tournament-Name)
– Paste your welcome and instructions in the Message… read this over and over for typos, especially the first time (sample)
– Click on Send Email
You will get the list of teams/emails this was sent to AFTER they have been sent, usually just a minute or two… SAVE THIS for your files as confirmation in case someone says they didn’t get the email (there are a variety of reasons they wouldn’t, including work firewalls, virus scanning, junk folder, they reported you as spam last year, on and on… but the confirmation is proof it was SENT. They can see this email on their own message center when they log into their team app)

5. MARKING PAID/ACCEPTING/REGISTRATION-OK/SENDING MAIL ALL IN ONE FELL SWOOP (EXPERT MODE)
If you feel confident, you can eliminate many steps by doing everything all at once. Remember, computers make very fast, very accurate mistakes…

– Team Applications Module>Filter by Fees-Pending>GO!
– Select All
– Select the appropriate Accept/Paid/RegOK/Email (Expert Mode) from the drop down menu
– Scan and rescan the teams to make ABSOLUTELY SURE you want to act on the teams checked.
– Uncheck those you do NOT want to Mark Paid/Accept/RegOKSend Email
– Write the Subject (Your Team Has Been Accepted in the Tournament-Name)
– Paste your welcome and instructions in the Message… read this over and over for typos, especially the first time (sample)
– Click on Send Email (The red MARK CHECKED RECORDS will not be visible, but the records will mark once you send the email)
You will get the list of teams/emails this was sent to AFTER they have been sent, usually just a minute or two… SAVE THIS for your files

6. EDITING APPLICATIONS (updating info, wrong phone number, email, notes, etc)
– Team Applications Module>GO!
– Click on the Team Name hyperlink
– Edit what needs changing
– Click on Modify Application at the top or bottom of the screen, whichever is closer to your cursor…

Moving on to scheduling…

Add-ons and Discounts

You can set up to charge additional value-added services to your application as well as set up marketing discounts on your Team Application. It is important to note that the team will need to opt into these services when they apply though you can certainly add them to their application on the back end, if you choose to offer that.

You can add on as many additional paid services as you would like, though there is probably a practical limit. For example, you may wish to hold opting-out of Friday night games or early Saturday morning scheduling as a premium. Other popular options might be no-conflict scheduling for coaches with multiple teams or refundable fees (though you should check with your local and state laws as this might constitute a regulated insurance product)

You should keep the add-ons as simple as possible as they are designed to be upcharges to the single team application. Avoid designing offers that require a certain number of teams or making one add-on conditional. Each add on will ADD to the application fee. Do not rely on teams to select this add-on OR that add-on. Conversely, a discount will subtract from the fees. Only ONE discount may be claimed per team application, though you can apply another on the back end, if you choose.

Setting up add-ons and discounts

1. In the Team Applications Module>Set up Add-Ons/Discounts>GO! to go to the set up screen.

2. If you have set up Add-ons/Discounts prior, they will be listed below. You can edit the details of one or more and update all changes by clicking Save Changes. You can delete any code that has not been used, but once it has been used, the delete link will be removed. Inactive codes will appear on a red line. You can make a code that has been used prior and will not be available for future applications, but will remain intact for teams who have used it prior. Inactive simply drops it off the team application. You might use this if you only wanted to offer to a limited number of teams.

To add a new code, use the top line.

  • The sort code is how the Add-on will appear on your application.
  • The amount should be in the format #.## An add-on will be positive, a discount negative.
  • The code is a short (max 15 characters) to quickly identify the add-on or discount. In the case of a discount, it is the code you will tell the team to enter EXACTLY and in ALL CAPS. If you enter a space or any other character other than [0-9][A-Z] it will be eliminated.
  • The title is the top line, short description, max 30 characters
  • The description is the longer explanation, max 650 characters

Click Add to add the add-on/discount to your admin.

How add-ons/discounts appear on the team application

1. When teams click on the Apply menu, if you have Add-ons assigned, they will appear on the front application page prior to them clicking through to the actual applications. Discounts will not be listed as it is assumed they will be used in marketing materials or through a separate offer. If you intend for every teams to take advantage of a discount, like an Early Bird, you should edit your Register Page in the Website Maint Module, in a front news story or both to disclose the discount code.

2. When the team completes their application and you have add-ons available, they will be repeated at the bottom of the form with two buttons, “Submit Application” and “YES! I want add-ons” If a team submits their application and later changes their mind about the add-ons, they will have to contact the tournament to manually add the option. (In the case of a cancellation protection fee, for example, you don’t want teams to sign up for it weeks before your event.)

If the team clicks through to YES! but then changes their mind, there is a button that says “I’ve changed my mind.” Regardless, a click on either button submits their team application, but if they have clicked “YES!” the final calculation of their fees and their payment coupon is generated AFTER the second submission. (The team can always retrieve their payment coupon by logging into their team application.)

3. The team can select one or all of the Add-Ons on the second screen they will be presented after they click on the “YES! I want add-ons” button. The cost of each selection will be added to the fee, minus the discount if that was also entered.

4. Discount codes are entered by the team near the top of the application. If there is no match on an active discount code, they will get an error box and an opportunity to re-enter it.

Managing add-on charges and discounts

1. When a team selects an Add-on or Discount, it will be added to their teams record in the Team Applications>Manage Team Applications>GO! under the Msgs column, [ADJ]+ for Adjustments. If there have been add-ons or discounts applied, there will be a number next to the ADJ. In addition, you will see a notepad icon in the Seed column as well as a notepad icon in your Scheduling Module when you are ready to schedule. This will contain the add-on code the team paid for.

2. To view, adjust or manually add an add-on or discount to the team, click on the ADJ in the team row. (or if you are in the Team Detail screen, you can click on the Record Adjustments link) This is also where you can record adjustments that are only available as an admin like comp fees, discounting fees independent of your public marketing discounts, etc. This is the ONLY way you can adjust the fees. A + will add, a – will subtract.

If you wish to adjust on an Add-on or Discount, you will need to enter it as an admin-type adjustment as the system will lookup the standard price and code of any selected add-on/discount. For example, if you wished to add an additional $10 to an EARLYBIRD for a simgle team, you should enter it as – 10.00, Other and give a reason. Selecting EARLY BIRD will just force another $50 discount.

3. To generate a report of all add-ons and discounts issued, select Team Applications Module>Team Fees Adjustments Report (XLS)>GO! A table will be built and if you would like to export the data as an XLS, click to download and save to your drive as you would a Team Apps, Schedule or Referee export.

Older System Notices

As it turns out, the more system notices there are in the header of the admin area, the less people will read them. So, we’re moving older notices here.

Moved on 2023-03-27
EMAIL NEWSLETTER: We sent out a newsletter on Wednesday, Jan 25, 2023 that has a bunch of stuff you will need to know for 2023 and 2024. Please double check that all email from helpdesk@tourneycentral.com never goes to spam and gets flagged with the highest priority. Here is the link if you missed it or would like to pass it along to someone else on your team.

ADMIN TIME-OUT: You should log out using the red LOG OUT top menu option after every admin session. Don’t just close the browser window or walk away with the admin open. It will expire. The admin session is set to expire after two hours of inactivity, where you will need to log in again. But, you really should log out after your are done with your admin session.

HTTPS AND DOMAINS You may have noticed your website may be redirecting to a tourneycentral.com address. Your website is reachable with your domain address, but Google has decided to downgrade non-SSL sites, so we’re moving to https. Your website has always resided here and you may continue to use your domain in your marketing. (If you host your own domain and you want https encryption, you may have to configure your DNS to redirect to a xxx.tourneycentral.com subdomain… call us for details)

DOB FIELDS ON THE APP FORM: Because US Soccer has standardized on calendar DOB for age groups, we have eliminated the DOB fields on the application form.

SOFTWARE VERSION: The latest install is 22.200 Build 20221111122600 Your version is displayed in small gray type right below the main header.

TOURNAMENT PULSEPOINT When the PulsePoint data is older than four hours, the login screen will reflect that and the SuperUser will be given an opportunity to rebuild the data files from the Admin Messages Module, only visible to the SuperUser.

SAAS AGREEMENT We have updated your SaaS agreement, mostly to be clear about the duration and what is covered as a Software As A Service, the CANCELLATION POLICY and to clarify the two types of invoice charges, a COMMITMENT and a PRODUCTION fee. In addition, some clarification about your legal responsibilities concerning the collection and use of data from online forms. Please take a moment to read it in your Admin Messages Module. Last updated: October 11, 2022.

EMAIL NEWSLETTER: We sent out a newsletter on Wednesday, Jan 25, 2023 that has a bunch of stuff you will need to know for 2023 and 2024. Please double check that all email from helpdesk@tourneycentral.com never goes to spam and gets flagged with the highest priority. Here is the link if you missed it or would like to pass it along to someone else on your team.

Moved 2020-01-01
MAPS Sept 4, 2018: We have assessed the maps use on the public pages and have determined Google pricing is far out of whack with the cost structure and needs of our product. We are moving to using Mapbox for the public maps, but will continue using Google Maps for the PulsePoint for now… this may change. As of June 27, 2018: Google Maps has modified the terms, conditions and, most importantly COST of its API. As a result, we will be modifying the maps on both the Travel Page and the PulsePoint to accommodate these changes. You may notice slight modifications, i.e., no logos or marketing messages, field locations only, etc.

CHROME BROWSER: If you are using the Google Chrome browser and you see the error ERR_NAME_NOT_RESOLVED, this is NOT a website or DNS issue. This is a well-documented Chrome browser issue where it tries to predict where you are going and serving up an oddly-formed cache file instead of your actual site. This will most likely occur while you are updating scores or editing lots of teams, etc. This will generally (maybe) clear up by itself after waiting an indeterminate period of time (3-4 minutes?) but you can also force this by clearing the cache, fetching a new IP address or switching to Firefox or Safari. If you want to dig into the settings more, please Google troubleshooting guides, but make sure you have a plan in place BEFORE your tournament weekend.

DATABASE UPDATE PLANNED: March 9, 2021 … We will be updating the backend database server after the 2021 spring season concludes around end June-early July. More details will follow. During the cut-over, you may experience momentary, intermittent disconnections as we cut over to the new database server. As always, we will keep interruptions to your event minimal and off-peak.

HTTPS AND DOMAINS You may have noticed your website may be redirecting to a tourneycentral.com address. Your website is reachable with your domain address, but GoDaddy — the registrar — is having some issues with their masking and we decided to discontinue using the masking. Your website has always resided here and you should continue to use your domain in your marketing, but having a tourneycentral.com domain is necessary for Google Maps to work, as well as our migration to https:// in the coming months. (If you host your own domains and you want https encryption, you may have to configure your DNS to redirect to a xxx.tourneycentral.com subdomain… call us for details) You may also have to log in again from the xxx.tourneycentral.com/admin address as the system may kick you out if you are already logged in.

SSL CERT UPDATE: We will be installing an updated SSL Cert on Thursday, June 24, 2021 at about 9:00pm ET and will need to reboot the web server after the install for the changes to take place. Your website may be offline for a few minutes as this operation completes. Thank you for your patience.

PLANNED MAINTENANCE: We will be doing some routine maintenance the week of July 20 between 12am – 2am ET. It may require a server reboot, which will mean your site may be offline for a few minutes if needed. Thank you for your patience.
PLANNED MAINTENANCE: We will be doing some routine maintenance overnight August 26 between 1am – 2am ET. It’s not likely, but it may require a server reboot, which will mean your site may be offline for a few minutes if needed. Thank you for your patience.

SIX DIGIT PIN IN ADMIN LOGINS: You may be seeing the addition of a PIN field for admins. They are coming in 2021…. just a heads up

WE WILL BE REBOOTING THE WEB AND DATABASE SERVERS AT 8:00PM ET TODAY APRIL 19, 2022 to clear an unexpected and since resolved issue with a load balancer. The reboot is only a cautionary measure, but necessary to baseline connections among other cloud components. It may result in a brief disruption of your site’s availability. Thank you for your patience.
We will be installing an SSL Cert renewal this week either Tuesday or Wednesday (5/31-6/1) overnight. We do not expect any service disruption, but there is always a slight risk with any maintenance. Thank you for your patience.
Our hosting service has detected an issue with one of its cloud servers and has determined they will need to reboot our servers to rectify the situation. This will happen roughly at 6pmET TODAY, Sunday June 12th. The service outage should be brief, usually 5-10 minutes max. Thank you for your patience.
SERVER MIGRATION: We will be doing some server maintenance throughout January. If you manage your own domain, we will contact you regarding a new IP address if necessary. In any case, we will keep disruption to your site to a minimum. Thank you for your patience.

Setting up a Stripe Account

You will need your business docs, like banking info, EIN, tax info, someone at your organization that is legally responsible for the money in, out, veracity of the info (like a Treasurer, Board Member… could even be you… ) You will need at least one human being on the account… they try not to be used as drug dealers and if the feds come knocking, they just need someone to rat out… 🙂 (seriously, though, they will likely freeze your money on down the road if there isn’t at least one human being on a corporate account, so best to do that up front… )

While we’re not in the business of dispensing legal or tax advice, we recommend that this account have reasonable controls in place and there is an official policy and procedure that folks there follow…

  1. Go to Stripe.com
  2. Set up a new account
  3. Sign into your account
  4. Click on the Settings gear at the upper right
  5. Complete all the business info on the lower left down to list through Tax Details… don’t need to do any of the branding stuff as that is for invoices and stuff.. UNLESS you will be using the account for more than tournaments… we don’t need that.
  6. Once Stripe accepts and approves everything (might be a day or two, might be almost immediate, they may need additional documents, they’ll ask) then
  7. Sign in (you should have set up 2FA by now, either to a cell phone (authenticator app suggested, just in case, so another admin member of your staff can access the account if needed)
  8. Click on Developers
  9. Click on API Keys on the left
  10. Generate keys
  11. Either email them to TourneyCentral (call first, let us know they are being sent and please allow us to CONFIRM we are awaiting them BEFORE sending over your keys OR install them on your events by logging into the Admin WebMaintModule>Variables>GO!
  12. When we see the update, we’ll test and if they work, make sure the credit card stuff displays, etc. If anything needs to be corrected, we’ll let you know.

VARIABLES NOTE:
If you do not see fields for Stripe in your Website Maint Module>Variables>GO!, email TourneyCentral and ask us to flip your credit card processor to Stripe on your Global Variables…

Gmail is blocking my emails out — how do I fix this?

Gmail is a free email service that is coming to the end of free.

Google wants to sell more Google Workspace accounts to for-profit and non-profit organizations. Unfortunately, a soccer tournament is one such organization. Google has decided that the volume and pattern of traffic that most tournaments generate looks like spam to their algorithms.

Even if you don’t use gmail to manage your soccer tournament, a lot of folks use gmail, so this new direction in Google’s business model will affect you in your ability to reach your teams, referees, other team members.

You can’t appeal to Google (believe me, we’ve tried!) so you just need to change the way you send out emails. And pay money, of course.

The easiest way to manage this is to sign up for a PAID Google Workspace account, link up your domain to receive and send emails, and make sure the SPF record and DKIM keys are active. After those two things are verified, you should then install a DMARC record on your domain (I know, it’s a bit tech-y, but since Google wants you to sign up for their paid email, they make it easy. And, if TourneyCentral holds your domain, we can talk you through the Google end and edit your DNS records for you.)

If your club uses a professional email service with their domain name, and they have SPF, DKIM and DMARC all set up, you may want to ask them for an outgoing email address, like do_not_reply@soccerclubname.com

Then, you can install this in the “Outgoing Email From” fields in your Website Maint Module>Variables>GO! Be sure to send out a sample team application or contact request to make sure the email address works.

We have set up an email with SPF, DKIM and DMARC records to help aid in email delivery at do_not_reply@trnyctrl.com as the default. As of Jan 1, 2023, this will be the only outgoing email address you will be able to use unless you take over management of your domain and set up with SPF, DKIM and DMARC. As of December 31, 2023, we will no longer register or pay for a custom domain. If you wish to maintain your domain, you should set up an account at GoDaddy and request that we transfer ownership to you. Also, if you have your domain pointed to our server IP, you should set up a forwarding to your https://[event-name].tourneycentral.com address instead UNLESS you have arranged an SSL Cert with us on your domain.

In some cases, using an alternative domain to your website domain fixes the problem, at least temporarily. We can help secure an alternative domain which you use only for outgoing email. But we suspect that Google will eventually tag and block any domain used for email that does not have SPF, DKIM AND DMARC. In short, you should budget at least a few hundred dollars more a year for professional email.

The key to this appears to be Google cracking down on emails that do not have SPF, DKIM AND DMARC records. Fortunately, most professional email services will have them if you link up your domain to their servers. But it appears the use of gmail.com address for high-volume organizations is coming to a rapid end.

00: Scheduling your Tournament; Overview

Scheduling a soccer tournament is a pretty straight-forward process. Good scheduling requires human skill and attention to detail, but the steps to get there are fairly basic.

Start with the Scheduling Dashboard. Do the steps in order. Don’t jump around, don’t jump the gun. Make sure each is solid before proceeding to the next. Remember, changes done early in the process are always less complicated than changes done at the end.

Here are the specific steps, in the order they should be done. If you have created a schedule last year, most of the data you will need is already in the system. You will need to edit, add or delete based on your current year’s distribution of teams. Review last year’s schedule for what worked.

Dashboard

  1. Create and define your divisions based on the distribution of teams who applied. GO
  2. Set up your dates and all possible play start times. GO
  3. Set up your venues and playing fields on each venue. GO
  4. Create placeholder teams. If you set up up divisions carefully you should be able to create all your placeholders in one fell swoop with one button. GO
  5. Place your teams in divisions, bracket and seed them. Pay attention to the seeding order and the groups they will be placed in. GO
  6. Update and/or review your tie-breaker rules. GO
  7. Schedule games by division. If you seeded properly and set up your divisions well, the pairings will fall into place. GO
  8. Review and publish GO

SCHEDULING MENU
00: Overview
01: Set up tournament divisions
02: Set game times and dates
03: Set up venues and playing fields
04: Create Placeholder Teams
05: Placing Teams into Tournament Divisions/Groups
06: Update and/or review your tie-breaker rules.
07: Schedule games by division
08: Review and publish
09: Making Changes to a Schedule

document editing in process…

01: Set up tournament divisions

Read the definition of TOURNAMENT DIVISION first

  1. In the Scheduling Module, select Set up Tournament Divisions from the Action drop down menu.
  2. Click on the Go! button.
  3. Enter the division name in the Division field.
  4. Enter the Gender
  5. Enter the Age
  6. Select the sort order how you would like the divisions to appear on your website.
    -For example if you had Gold, Bronze, and Silver divisions; Gold would be 1, Bronze 2, and Silver 3.
  7. Select the game type
  8. Select if there will be extra games or not.
  9. Select how many brackets
  10. Select how many teams per bracket.
  11. Click the Add button.

To EDIT divisions already in place, make first delete any division you will not be using. Then add any new ones. Finally, make all the changes in place on the remaining divisions and click “Save Changes” at the bottom.

More Settings
The minimum settings for the divisions are at the top screen. However, you can set up more settings for each division by clicking on the “More” link. The graphic below illustrates the options available.

SCHEDULING MENU
00: Overview
01: Set up tournament divisions
02: Set game times and dates
03: Set up venues and playing fields
04: Create Placeholder Teams
05: Placing Teams into Tournament Divisions/Groups
06: Update and/or review your tie-breaker rules.
07: Schedule games by division
08: Review and publish
09: Making Changes to a Schedule

Managing Team Document Uploads

This module is in BETA right now and open to only a few events for live testing. We’re 99.99999% sure it is ok and ready for production, but our beta-testers are offering feedback from real world use that we would really like a chance to incorporate into the tools before general release. However, if you really, really, really want to open this up for your event AND you are willing to live with a few undiscovered bugs AND you are willing to give feedback after your event concludes, holler to helpdesk@tourneycentral.com and ask. We may be a bit overwhelmed going into the fall season with new software, but we will consider your request seriously. Thanks!

This will be repeated a few times in this document, because we are serious:
Uploaded documents WILL NOT BE RETAINED after your event

Your Admin Modules include tools to manage team document uploads for registration. Before attempting to use these tools, you should first:

  • Make sure you have given your teams access to the forms you need completed and returned
  • Defined the forms you need returned so they appear on the drop down list in the Document Center
  • Provided the teams DETAILED and COMPLETE instructions on what you expect and when
  • Set up an emergency email address just for registration documents in the event the team can’t or won’t figure out the document center (yes, still are people out there scared of technology but comfortable with email)
  • Turned on the Document Center correctly
  • TEST, TEST, TEST

99.99% of all problems with uploading documents can be solved with clear and correct expectations and instructions. They don’t need to be lengthy; just address the WHO, WHAT, WHERE, WHEN and HOW clearly and briefly. The other 0.01% of the problems are generally a) the file is too big b) the file is the wrong format c) the file is corrupt. Fortunately, we’ve provided a Troubleshooting Guide for the team (and one for you.)

Let’s get started:
We will assume you have already made your forms available to teams that have been accepted and confirmed. Teams who have not been accepted will not be able to submit documents, but teams that have not yet confirmed may… assuming you have given them access to the registration forms.

Opening your Document Center for Uploads
  • Define the document types you want in the Team Applications Module>Set up Document Uploads>GO! Add the document type to the top line and click Add. To make changes to existing documents, first delete any you no longer need, then edit those that need editing and Save Changes
  • Go to your Website Maint Module>Variables>Go!
  • If your event is using SportsForms to manage your documents, you should toggle Use SportsForms to On and Save Changes. While TourneyCentral and SportsForms are not integrated, we have established some language that guides teams who may have trouble getting your broadcast emails to the right place. Setting the SportsForms to On will override any of the other settings below.
  • To open your Document Center, make sure your SportsForms option is set to Off, your Advance Registration is Yes and Lock Reg Documents Uploads is Unlocked. Save Changes
  • Go to an accepted team, log into their Team Aplication using their TeamID number to make sure the Upload Documents link appears on their Application.

That’s it. You are now ready to accept Registration Document Uploads.

Managing Documents from your Team Applications Module
  • As teams upload documents, you will see a red document icon, along with the number of documents waiting to be accepted.

    It is recommended that you limit your work within app groups, accepted and incomplete reg (or whatever small group you feel comfortable with.) Teams without documents uploaded will not have an icon; teams you have previously accepted and marked Ok will have a green icon in the first column.
  • Click on the red icon to access the Document Management Screen.

    Most likely, you will be accepting all the documents and there will be a complete set, but in the rare instance this is not the case, you can choose to accept documents individually and provide the team feedback on the ones that are problematic. You can also delete a document.
  • To review the document, click on the document link. It will pop up in a separate window.
  • Uploaded documents WILL NOT BE RETAINED after your event, so if you think you will be needing them after your event, you should download them to your local computer or to a cloud-based data locker. Again, we will not retain documents. There will be no exception to this. Once they are deleted after your event, they are really, seriously, permanently deleted.
  • There is a 15 minute timer once you open the window to manage the documents. You should also close the window once you are done with the team.
  • To Accept all the documents, click on Accept ALL documents. The document will be accepted and the team marked OK as registered.
  • If you bulk OK to Register the teams from your team listing, you will also be accepting all the documents for the teams you check. Be careful you do not OK the team for registration. You will still be able to click through to their uploaded documents from the green document icon and view the documents they uploaded. You will also be able to delete the document, but it get messy and is usually a bad idea.
What the Teams See from their Application

Remember, a team must be accepted to see the document upload link. If they don’t see it, double check they have been accepted.

The easiest way to get familiar with the document upload center is to approve one of your club teams, log in and click through.

Basically, there are four steps for a team.

  • Make sure the document is one of three approved formats; pdf, png and jpg. A PDF is preferred.. real PDf, not something that was saved out as a pdf with scans and such. Most phones will not enable a user to scan a document and save it as a pdf. Size also matters. the document must be under 2meg, 1.7meg is a safe target size.
  • Select the type of document
  • Find the document on their computer
  • Upload

If the team needs to delete a document, they can until you accept it. If they have already been approved to register and have changes or additional documents, you must first toggle them Incomplete for registration before they can submit additional documents. Also, if they have a document in two parts for whatever reason, they can submit two under the same document type. If they are REPLACING a document they previously uploaded but has not yet been accepted, they should delete the existing one first.

A troubleshooting guide is linked for their convenience.

Waiting until the last minute

Teams will wait until the last minute and rush through, get frustrated and blame the system. They really should not do this, but they most likely will anyway. Can’t be helped; people gonna people! Every server system has limitations and if too many people are all trying to upload too many documents all at the same time, they may get a server busy error. They should step away and attempt to submit documents during non-peak times. We can only all do our best.

And lastly, because if you did not see this the first two times above, this is your last warning:

Uploaded documents WILL NOT BE RETAINED after your event

Troubleshooting file uploads

We’re sorry a team is having trouble uploading your registration documents.

Mainly, they should have ALL OF YOUR REGISTRATION DOCUMENTS TOGETHER WITH THEM BEFORE attempting to upload files. They only have 15 minutes from the time they logged in in which to accomplish this task, which is usually more than enough time. If they don’t have all of their registration documents assembled now, they might want to log out and attempt again.

In addition to having 15 minutes between document uploads, (a total of 15 minutes before the login to their Team Application expires) here is a list of common trouble-shooting points which will help them be successful in uploading documents.

  • If you are rushing to meet a deadline to submit your registration documents, so are a LOT OF OTHER TEAMS! Heavy traffic may affect the server bandwidth. You might want to come back and try again. Heavy traffic is early mornings, dinner time and between 9-11pm. Of course, the heaviest traffic is gonna be about 2 minutes before midnight the day before they are due. Don’t wait!
  • Make sure the file format is supported. Only .pdf, .jpg, and .png formats are allowed.
  • Check the file size. It should be under 2MB. If you need help making the file slimmer, see the point third from the bottom of this list. There are also web-based tools that will convert a file to a particular limit. Use 1.7MB instead of 2MB as a target.
  • Make sure the file is LEGIBLE! If you can’t read it, the tournament event can’t read it either.
  • Ensure the file has the correct extension. For example, a JPEG image should have the “.jpg” extension.
  • Ensure that the file names are in lowercase and do not contain spaces or special characters.
  • Keep file names short and descriptive for better readability. Rename them before attempting to upload. Shorter file names are always better, e.g., “2023liab.pdf” instead of “My teams’s liability form signed on may 12th, 2023.pdf”
  • Verify that the file is not corrupted. Try opening it on your computer to confirm.
  • Clear your browser cache and try uploading the file again.
  • Check your internet connection. A slow or unstable connection can cause upload issues.
  • If you used your phone to take a photo of the form, make sure the extension is .pdf or .jpg and the file size is below 2MB, but it is also legible. It is almost always better to SCAN a document using your iPhone or Android camera’s “scan document” function or scan a document for Dropbox, Google Docs, etc.
  • Try using a different web browser. Sometimes certain browsers can have compatibility issues.
  • Disable any browser extensions or plugins that might interfere with file uploads.
  • DIRTFT which is Do It Right The First Time. Sure, you can always delete the form and re-upload it OR upload additional pages of the forms as they change — life happens — but once the tournament event has verified the document, your team will be marked “OK” as registered and you will need to contact the tournament for exceptions. Nobody likes exceptions. Don’t be that coach. DIRTFT
  • Verify that the file is not password protected or encrypted, as it may not be accepted.
  • Check if the file size exceeds the maximum limit of 2MB.
  • ZIP files WILL NOT be accepted.
  • Double-check the spelling and accuracy of the file name before uploading.
  • If issues persist, you most likely have a whole team of young people who are digital natives. Find one of them to help you out.
  • Some teams are simply not going to understand how or don’t want to troubleshoot why their files won’t upload. In these limited cases, it might just be easier to give the coach/team rep an email address and accept the file(s) as an attachment. You may want to set up a separate gmail just for forms and discourage teams from using it for other uses.

The team SHOULD NOT contact TourneyCentral for help. We will refer them to this page and you.

Addressing health requirements in a pandemic

Yes, post signs that may be required by your state, your state association in exchange for sanctioning as well as local municipalities. But we recommend you give your soccer tournament even additional protection by including pandemic containment behaviors in as part of your official rules. That way, if a team, player, parent, coach, referee, staff or volunteer does not agree with wearing a mask, it does not become a “rights” issues, but rather a condition of participation.

We never recommend blind copy-paste and always consult your legal representation before including anything in your official rules.

In addition, many state associations are requiring a Return to Activity (RTA) waiver for players, coaches and referees. You should be aware what your state association requires for your event. Here is the page from Ohio South.

Here is some sample language to get you started. Again, JUST A SUGGESTION! Do not copy/paste blindly.

Pandemic containment
The tournament complies with all prevailing health department, state and local orders. All participants are expected to comply with these orders as a condition of attending the event.

In addition, the tournament requires the following:
– Coaches will wear a properly fitting face mask at all times while in the venue.
– Players will wear a face mask at all times while not competing in a game on the pitch. Players are also encouraged to maintain distance from each other on the pitch whenever possible.
– Players and coaches will maintain a distance of at least six feet between each other while on the sideline.
– Referees will wear a properly fitted mask at all times while on the venue.
– Spectators for each team will be limited to a maximum of X per game, and be required to wear a properly fitted face mask and maintain a minimum distance of six feet between each other while on the touchline. While vocal support is encouraged, pulling the face mask down while doing so will be grounds for being ejected from the venue.
– No tunnels or handshake lines are allowed.
– Anyone within the venue and not in their vehicle will wear a properly fitted mask and maintain a recommended minimum distance of six feet at all times while on the venue.

Failure to adhere to the health safety rules while on the tournament venue will be grounds for ejection from the tournament. Please don’t put either of us in a position where your child or coach will not be allowed to compete.

01: Planner – Overview

There are three screen views for the Planner Module; Overview of the whole event, Committee Definition and People.

The Overview will be your most used view. From there, you can mark it complete, add members, email the committee members, add/edit an activity and if necessary, delete an activity.

If you have used the Planner Module for your event last year, all of the dates have been rolled forward a year automatically. You should tweak them to fit your calendar better, especially if you have moved your event to a new weekend.

Setting up:
You should do these things in order.
1) Add all the people you wish to assign to activities. You can include various roles you may not ever assign activities to and include as a member of the committee. You will need to have a person signed up to assign an activity.

2) Set up your Committees.

3) Set up Activities in each Committee.

4) Assign people to Activities.

Emailing Committee Members
If a committee has members assigned, there will be an email icon to the left of the Add/Edit Members button. Click that, deselect anyone you do not wish to email, fill in your subject and message and send.

0. Overview
1. People
2. Committees
3. Activities

02: Planner – Managing People

The first thing you want to do it add people.

Select the Add/Edit People from the Planner Module Action Menu and click Go!

Adding a new person:
Add a person to the top line; First name, last name, initials as you want them to appear on the Overview, their phone and email. You will need to have a complete record for it to add.

Add as many people as you think you will assign activities to or make a member of a committee. Its ok to have more people than you will use, but they must be here to be assignable.

Editing Details:
Edit the details of the person or persons in the record listing below. You MUST have a complete record or the line will not save. Then click on the Update People button.

If they have been assigned a task previously and you change their initials, they will also change on the Overview view.

Deleting a Person
To delete a person, click on the Remove link in their row. All committee and task assignments will be released upon removal! Be very careful that you want to remove a person. If you remove them in error, your only option will be to add them back and reassign them all the tasks they were assigned previously.

Sending Email to Everyone:
To send an email to everyone, select the email icon to the left of the Update People button. A small window will pop up. You can then deselect a user if you need to. Write your subject line, you message and hit Send.

Each user will be sent an individualized email.

0. Overview
1. People
2. Committees
3. Activities

03: Planner – Setting up Committees

After you set up all your People, you will then want to set up your Committees. These are large tasks which will have smaller activities assigned to them. You can also assign people into Committees or allow the system to assign people as they are assigned activities.

Select Add/Edit Committees from the Planner Module Action Menu and click Go!

Adding Committees
Add a committee to the top line and click add.
Repeat for as many committees as you have.
Tip: Since the committees will sort alphabetically, if order matters, you may want to number them 01: First Committee, 02: Second Committee and so forth…

Editing Committees
To make edits, edit Committee Names in place and click on Update Committees.

Deleting Committees
TO delete a single Committee, click on the Delete link in the row. All the people assignments will be released, but the people will still remain in your Planner Module for you to assign to other committees and activities.

Assigning People Into Committees
You can add people into a committee using the Add/Edit Members button on the overview OR you can give them an assignment and they will be automatically added if they are already not a member. If you have people who are members of a committee but don’t have any formal responsibilities to completing any tasks, you should add them using this button.

When you click on the Add/Edit button, you will see a drop down menu of all the people you have added in your People screen. If a person is already a member of the committee, they will not be on the drop down menu.

To add a person, select their name, check “Chair” if they will be the chair and click Add. Repeat as needed.

The Chairperson will be highlighted in yellow. You can have only one chair per committee and you can set a new chair if needed by clicking on the Set link in that person’s row.

To remove a person from a committee, click on Remove in their row. Their committee membership and assigned tasks in that committee will be removed and their name will appear again in the drop down menu.

0. Overview
1. People
2. Committees
3. Activities

04: Planner – Setting up Activities

Once you have all your committees defined and set up, you will then add activities. The activity should be small enough to have a start and due date attached and have only one person responsible. If it is too large for one person, split up the task until it is not.

Adding an Activity
From the Overview on the Planner Module Action Menu, click Go!
Under each committee name, click on the Activity [Add] link.

Add the activity to the top line. If you know to whom you will be assigning it and the dates, add those now.

Repeat for as many tasks as you have for the committee.

Editing the Activity
You will edit the activity from the Overview view. To Delete, click on the Delete link (read below, the same will happen from this link) To mark it complete, click on the Mark Complete link.

To edit the details, click on the link.

Deleting the Activity
Click on the Delete link on the activity row. Any person assigned will also be released, but will remain as a member of the committee and in the people screen.

0. Overview
1. People
2. Committees
3. Activities

02: Set game times and dates

Add all possible dates that you will schedule games on.

Then add all possible times you will be using.

Most likely, many of the times will already be pre-loaded from last year. Delete and/or add any changes from last year.

If this is your first year, you will need to load all the times you think you’ll need.

SCHEDULING MENU
00: Overview
01: Set up tournament divisions
02: Set game times and dates
03: Set up venues and playing fields
04: Create Placeholder Teams
05: Placing Teams into Tournament Divisions/Groups
06: Update and/or review your tie-breaker rules.
07: Schedule games by division
08: Review and publish
09: Making Changes to a Schedule

03: Set up venues and playing fields

Set up Venues
A venue is a location that has fields (pitches) You must set up a venue before you can set up a field, even if the venue contains only one field.

If you are setting up a new venue, select Add a New Venue. If you are editing an existing venue, select Edit the Venues and click Go! (You must have at least ONE venue assigned as the Main Venue with GPS data and full address information, including ZIP Code. If this information is missing, your Google Map will not build.)

Set up Fields
Once you set up your venues, you can assign fields to the venue. Each field must be attached to a particular venue and have a unique name (code)

SCHEDULING MENU
00: Overview
01: Set up tournament divisions
02: Set game times and dates
03: Set up venues and playing fields
04: Create Placeholder Teams
05: Placing Teams into Tournament Divisions/Groups
06: Update and/or review your tie-breaker rules.
07: Schedule games by division
08: Review and publish
09: Making Changes to a Schedule

Quick Start

This guide/checklist is a skeleton guide to get you up and running quickly. It only contains the basics to allow you to manage your tournament effectively. It is important that you do each step in order and completely for maximum effectiveness. When information is incomplete on your website, teams call you, send emails etc and ask for clarification. This eats into your management time that you have precious little of.

There is a lot in your Admin Area that allows you to extend your tournament as much as you need, including advertisers, sponsors, referee scheduling and more. Since TourneyCentral is dedicated to only soccer tournaments, it has a lot of tools that are very specific to competitive (and High School) soccer.

Ok, let’s begin. We will assume you have been sent the invitation email with your Admin Area Access Point and your SuperUser password. If you have misplaced this document, please email us at helpdesk@tourneycentral.com or call at 937-836-7477.

***
If you are a new tournament director, but your event has gone through at least one season with TourneyCentral, most of these steps will need simple edits. Again, do these steps in order, don’t skip around and make sure your edits are correct for the current season before moving on to the next.
***

A word about nomenclature:
When you see notation like WebsiteMaint Module>Variables>Go!
it means, in plain language:
– Log into your Admin Area
– Find the Web Maintenance Module
– Select Variables from the ActionMenu™
– Click GO!

Ok, let’s get started!

Getting started, the basic information

We have plugged in some basic information for you to help get you started. You should do the following at minimum before marketing your tournament.

WebsiteMaint Module>Variables>GO!
Complete the information on the Web Site Variables form. If you had a sanctioning form when we set you up, we most likely filled in all the dates and prices for you. If not, you should fill these in. Also, check to make sure all the age groups and genders you are accepting are represented. If more are there than is necessary, send a support email and we’ll take care of that.

If fees are NOT included, teams applying will be asked to submit fees of $0.00 so make sure you fill out the fees.

Email Distribution
Web Site Maintenance Module>Email Distribution
We have included the emails requested on set up, but please verify and edit as needed:
Make sure the emails are set to receive the various notifications from the site. You may use multiple emails per role, separated by a , ex: user1@domain.com,user2@domain.com,user3@domain.com Avoid using spaces and make sure the emails are ACCURATE. As with admin users, keep the number of emails per role to a minimum as some ISPs will see multiple emails sent many times as spam. Soccer tournaments produce a LOT of email, so you should also avoid using tax-payer emails such as schools, military, etc. (if we find government emails, we will remove them. We’re taxpayers here at TourneyCentral as well)

Website Pages
Visit each of these sections and add content. For the FAQs and Front Page, you will be able to add multiple records.
WebsiteMaint Module>
Edit the Rules page
Edit the About page
Edit the Referees page
Add an FAQ
Edit the Latest News/Front Page

In each of these, if you copy/paste from MS Word or a another web page, please look at the end result on the public side and make sure any funky characters and funny line breaks are removed/corrected. Please do not use HTML in these pages

Venues, Maps and Fields
A venue is a location that contains fields. The Venue will be included on your public map. We have added at least one venue when we set up your event.
WebsiteMaint Module>>Add a New Venue
Add as many venues as you will have fields. To make them show up on the general map, you will need to add the GPS data, longitude and latitude (Google Maps is an excellent product to find long/lat. especially for places that do not have physical addresses. Find the location on the google maps website, scroll way to the @ and copy/paste the GPS data…)
Example:
https://www.google.com/maps/place/Ward+Field/@39.8594463,-84.3268985,15z/data=!4m2!3m1!1s0x0:0xff5174a13bbf83e5?ved=2ahUKEwjc8-Log5bgAhWM2YMKHXxJBgQQ_BIwDnoECAYQCA
39.8594463 is the latitude
-84.3268985 is the longitude
We will help you if needed… just let us know.

SPECIAL NOTE ON MAPS
If the map does NOT appear on the Maps Page, please double check that the following are included in the map record:
– One of the venues is marked as the Main Venue. You must have a main to provide the center point for the map.
– The ZIP code is included in the main venue
– The GPS (latitude/longitude) information is included for the main venue and it is correct. If your map plunks your playing fields in Turkey or China, chances are your GPS data are wrong 🙂

We have included the main venue in your initial set up, complete with GPS data.

Hotels
If you are working with a Rooming Agency, they should give you a web address. Simply paste this into the Rooming Link field, add your Stay to Play statement and a short blurb on Hotel Front Page about how teams go about getting rooms. Save changes and you’re done with hotels.

HotelModule>Hotel Variables
Place a message on the Hotel Front Page at minimum to explain your hotel policy, how you wish teams to find hotels or work with your hotels. This is also a good place to plug your local community to teams visiting from outside.

Hotel Module>Add a Hotel
Add a hotel. To make them show up on the general area map, you should include GPS data

Hotel Module>Manage Reservation Dates
If you are using one of the forms that takes hotel requests, please be sure to include the dates. Otherwise, this is not needed.

Advertising and Vendor Module>Add a Company
You should enter your major sponsors here, checking the Major Sponsor and Visible. If you wish them to show up on the DEALS page, you should check DEALS. However, all DEALS will be charged our listing fee of $10.00. Major Sponsors ONLY are free, but if you also check DEALS, they are not.

Add advertisers here as well.

Referee Module>Manage Application Dates
The referee application allows you to split each day into am, am/pm or pm availability. You should set this for each date now to save your assignor some confusion.

That should get you up and running. There are a ton of other features and you are welcome to explore each of them, especially in the Advertising Module.

Moving onto application management…

04: Create Placeholder Teams

A placeholder team is a team description where you do not yet know which team will be playing. Examples of placeholder teams are WINNER A, WINNER B, First Points, Wild Card, etc. To schedule finals, semi-finals etc, you will need placeholder teams.

If you have not yet set up any placeholder teams, you will see a button on top of the screen that says Make Placeholder Teams. Before clicking that, MAKE SURE YOUR DIVISIONS ARE SET UP CORRECTLY!

Click that and the system will make WINNER A, WINNER B, placeholders, etc for each division. A 1 of 4 will make FIRST PTS, SECOND PTS by default in lieu of WINNER A/B. You should not change these descriptions as the schedule program looks for them as defaults. If you do change them, you will need to manually select them from the menu.
If you need to change the descriptions, make the changes, scroll down to the bottom and save the changes. IF ANY FIELDS ARE LEFT BLANK, THE PLACEHOLDERS WILL NOT UPDATE!

You should also delete any placeholders you will not be using to keep your scheduling neat.

If you need to add a placeholder (say Wild Card) use the Add fields at the top of the form.

1. Select the division from the Division drop down menu.

2. Enter the team name in the Team text box.

3. Click the Add button.

Make sure you have a Team 1 and Team 2 placeholder for each game before you attempt to schedule a division.

SCHEDULING MENU
00: Overview
01: Set up tournament divisions
02: Set game times and dates
03: Set up venues and playing fields
04: Create Placeholder Teams
05: Placing Teams into Tournament Divisions/Groups
06: Update and/or review your tie-breaker rules.
07: Schedule games by division
08: Review and publish
09: Making Changes to a Schedule

What causes email bounces

Emails from your Admin Modules and website pages will always be sent out, but that does not mean they will be received by the person you are sending them to. While we can’t track down why someone is not receiving your emails, here are a the most common reasons we are seeing.

NOTE: If you are hearing from multiple people that your email is not being received, there is probably a good reason you should investigate. Many times, it will be simply that your email looks like spam to the receiving email, especially Yahoo! HotMail and AOL. Simplify your email and ramp down the urgent words, like URGENT, FREE, LAST CHANCE, HURRY… stuff like that, especially in the subject line. Also, include as few links as possible. Shorter emails are better emails.

  1. Email is not correct.
    This is BY FAR the most common reason we see. The person who submitted the team application or question from the web form did not type in the correct email address.
  2. Email is full.
    More and more email services are pulling back on the capacity of the email services, especially the free services. Many of them are simply not notifying their uses except by emailing them, which they are not getting if their email boxes are full.
  3. Replying to a DO_NOT_REPLY outgoing email.
    When people respond to an email address clearly marked as DO NOT REPLY, you will not get their reply. If we happen to catch it and it is critical to your event (like a team withdrawing) we may forward it along as a Message Center email, but you should not reply on that to happen. You may wish to remind teams that all of the outgoing email is DO_NOT_REPLY and include your email address if you want. Keep in mind that any email sent to your personal email is not logged into the Message Center.
  4. MTA_BLOCKED
    This is mostly when government or corporate organizations have rules against receiving emails from specific organizations like … well, soccer tournaments. Teams and referees should always be discouraged against using their employer’s email to conduct soccer business, especially if that employer is a government entity. There may be exceptions for schools on High School or college events, but it is generally not recommended using an edu, gov or mil domain as the IT department may have blanket rules (or laws in some cases) to apply email blocks.
  5. No SPF, DKIM and DMARC records on your own email domain.
    If you are using your own outgoing email address and you do not have SPF, DKIM or DMARC properly configured to include our server IP address, you will likely see a higher that normal bounce rate. You should consult with your email provider.
  6. Copy/Paste from Word, Google Sheets, etc.
    If your outgoing message sent through the Team Applications, Marketing or Referee Modules is not being received, make sure you did not simply copy/paste from a word processor program without sanitizing it first to make sure it does not contain any illegal characters, including emoji. Many email programs are getting more and more finicky about just accepting ASCII characters from web-based applications that are not theirs. When in doubt, compose your message directly in the broadcast screen.

There are probably some more idiosyncratic reasons why some email is not being received, but these are by far the top causes.

Can I get a custom layout, fonts, etc for my tournament website?

Short answer, no.

The branding consistency with your site is contained in the graphic header and background color. The TourneyCentral sites are laid out like they are for a very specific reason; to give the teams confidence in knowing where to go and what to do with no fewer than one click. The feedback we get year after year from teams has been one of relief; a relief that they know where to go and they are in experienced hands when they get there.

If you have graphic design, UX/UI experience, don’t take this next thing I’m about to say personally, but the soccer market — with a VERY few exceptions — is dreadful with UX/UI, many designing their site with no clear “funnel” for the guest teams to know how to apply or get information about the event. Our sites are designed specifically to give them the WHO, WHAT, WHERE, WHEN, WHY, and HOW MUCH with as little friction as possible, get them to apply, confirm, get news, get schedules and scores.

We constantly monitor this funnel and refine slightly if/when we see CTA (Call To Action) clicks being missed. If you take a look across the landscape and go to a few non-TourneyCentral sites, you’ll get a sense of the problem without much effort. The “formulaic” layout of our sites is by design and benefits your operational needs.

That said, if you want to set up a micro-site on your club site, funnel teams into that initially and then link off to our site when they are ready to apply and are confident of your UX/UI skills, you can certainly do that. However, if we register and manage a domain as part of the overall package we provide your event, we will continue to point to the front page of our site. If you choose to register your own domain and point to your landing page or micro-site on your club site, you would then need to use the user_account.tourneycentral.com format link we supply to get the teams to your tournament content.

In the future, we may consider releasing a custom CSS/white label for those events who have demonstrated design skills. If you are interested in being part of that test group if/when we make that available, just let us know.

When we set your site up, we’ll match the colors and header design to your logo/event. That is usually all the guest teams need to establish credibility and comfort they are in the right place.

01: Sending an email “blast” to a marketing list

The Marketing Module is not a mass-emailer. It is a module that allows you to connect with your teams that have participated in your tournament event in previous years as well as a few coaches and contacts you have spoken to personally who have asked to be included on announcements. You should not mass enter contacts into the Marketing Module nor is there an import feature. (see Email Programs below…)

This Help Document will guide you through sending an invitation to last year’s teams. The Referee Module also has a marketing function for the referee assignor to invite officials from previous years.

CAN-SPAM Laws
We take spam laws very seriously and build the requirements into our tools. There are several ways to build an email broadcast list, but you are not allowed to “scrape” emails from public soccer club websites for the purpose of broadcasting to them. That the emails are public doesn’t qualify for a mass mailing with our agreement. They must be specifically submitted to you and agree to receive marketing emails. Transactional emails, i.e. last years teams are ok, as long as you respect the opt-out. Current teams can’t opt out, last year’s teams can through a link at the bottom of the email sent.

Email Programs
You are free to make independent decisions regarding the use of your data. You can export your data from the Team App Module, Marketing Module or the Referee Module and import it into a dedicated emailer program. A couple popular programs are MailChimp (our favorite and one we use, not a paid endorsement) Constant Contact or iContacts. Some events even use a bcc: list on a Gmail.com account for a very small team list.

Each service has rules, but the one to remember mostly is: If too many people report you for spamming, they may shut down your account.

Collecting emails the right way
If you’d like to build a mailing list, you can and should do it the right way; through double opt-in. Sign up with an account at MailChimp (or ConstantContact, etc) create a list and build an embedded form using their tools. Copy/paste that code into your About Page with an invitation surrounding the code. You may also wish to import your previous year’s teams into your list, but make sure you tag the source so you can manage them properly.

02: Attaching a PDF to an email broadcast

TECHNICALLY, you are not really attaching the PDF to the email, rather a link to a document you uploaded.

If you have a DropBox or Google Drive account, you may find it easier to place it there and create the link to the document. In fact, if the document is anything but a PDF (Word, XLS, PSD, etc) you will need to place it in one of these dropboxes as the document center on your TourneyCentral site only supports the PDF format (for security)

If your document is stored on Dropbox or Google Drive, we assume you know how to create a link and you can skip the first few steps below and go straight to sending out the message. Please refer to their documentation on creating a link.

  1. Create a web-friendly PDF document that you wish to distribute. Make sure you rename it with a small name that does not contain anything “weird,” including spaces. The shorter, the better. Make sure it is under 2Meg and contains .pdf in the file name.
  2. In the Website Maintenance Module, select the “Add/Edit/Upload Documents for Reg/General Use” option under the ActionMenu and click Go.
  3. Enter in a Document Title in the Form Name on he top line and click the Add button.
  4. Click on the Upload icon and upload your PDF File. Wait until you receive a confirmation and then refresh the list.
  5. Get the link to the uploaded PDF file by clicking on the Download Icon (second one on the right). Copy the document address from your browser’s omnibar.
  6. Paste this link into your broadcast message to the teams when you like. You may want to consider language such as “Download the PDF below.” If you are sending an HTML mail from the broadcaster or an email service, you may want to wrap the URL into a link.

05: Placing Teams into Tournament Divisions/Groups

When teams apply into your tournament, they generally apply as a particular age group. Depending on the number of teams within that age group, you may or may not have enough to divide them up into “flights” OR you may have to combine multiple ages into one larger group or “division.” Each of these “flights” is defined in the Scheduling Module>Divisions and once defined as such, they become their own “tournament division.”

While there may be a youngest age attached to each, the team is no longer defined by the age and then flight, just simply by the “tournament division.” In short, there are no longer any “GU10s” or “GU15s” but rather “GU10Black,” “GU10Red and “GU17-19” even though all the GU10 “flights” are U10 teams. But they may be 15 U10 teams and one strong U09 team playing up. (If you choose to keep the Gender/Age drop down menus along the left, then the system will use the age group specified in the application unless you change it on the back end. This may cause some confusion, so it is always recommended you switch to display the Tournament Divisions AFTER you place the teams into tournament divisions.)

This gives you maximum flexibility in defining a “division” without fighting the software with defining ages, flight as subgroups of ages, etc. The age of the team no longer matters for purposes of scheduling and scoring, only the “tournament division” it is in.

1. Make sure your Tournament Division are properly defined and refined. Delete any you will not be using from last year and add any that are new for this year.

2. Seed the teams using the appropriate filters in the Team Applications Module. Use the Seeding Format help doc to make sure the correct seed is assigned into the correct group. The Tournament Divisions will be a drop down menu next to each team name, sorted by youngest age. Select the Division to place each team into and save changes.

Make sure you click on the SEED button to the right of the GO! button in the Team Applications Module so you can make assignments and changes in bulk and act just on the subset of teams.

SCHEDULING MENU
00: Overview
01: Set up tournament divisions
02: Set game times and dates
03: Set up venues and playing fields
04: Create Placeholder Teams
05: Placing Teams into Tournament Divisions/Groups
06: Update and/or review your tie-breaker rules.
07: Schedule games by division
08: Review and publish
09: Making Changes to a Schedule

06: Update and/or review your tie-breaker rules.

When your event was first set up, we wrote a default set of tiebreakers for your event, 3pts for win, 1 for a draw and 0 for a loss with a maximum GD of 3 pts per game. The tiebreakers are H2H, GD, Fewest goals allowed, Goals for (limited by MAX GD) Your rules may vary and regardless of the text you stated on your Rules page, these settings need to match the rules. While you can specify tiebreakers different from the default such as adding a point for SO, red cards, etc, you should make sure you are not creating rules that the math on your settings cannot handle. If you do, your option is to turn off the standings and do manual calculations. The code that handles tiebreakers in soccer is very complicated and has been tested over many events and many years.

Standings are event-wide, so you are strongly encouraged to not create division-specific standings/tiebreakers rules. If you do, your option is to turn off the standings for that division and calculate them manually.

IMPORTANT:
You should review and establish the standings and tiebreakers WHEN YOU OPEN YOUR EVENT FOR REGISTRATION! Changing the tiebreakers in the middle of the event is bad form and in many cases, may be in violation of your state sanctioning. You should always review them, even if you have made no changes in the rules from your previous event.

Default Standings Settings
Here is what the default standings/tiebreakers screen looks like:
Default Standings

1. Display Standings Link on Schedule
This should remain On unless you wish to not display the standings on the schedules site-wide. If you wish to turn off standings for specific divisions (like U8/9/10) you would turn this off in the Divisions screens, click on the More… link and toggle them off.

2. Points for a Win
Set the number of points. The expected is 3, but if you are running a 10pt system, 6 is expected. If you wish to add GF to the points, check the box, then assign the additional points to a win. The amount should not exceed the MAX GD.

3. Points for a Loss
Assign points for a loss. Most events expect 0

4. Points for a Tie (Draw)
The expected is 1, but if you are running a 10pt system, 3 is expected.

5. Points for a Shutout Win
The team that scores against the other team of #-0 will be assigned the points you specify. The expected is 1, and if you are running a 10-pt system, is needs to be 1 (6 for a W, 3 for a tie, 1 for a shutout = 10) Also, if you decide a 0-0 score should award both teams with a point, check the box. Do not check the box with a value of 0!

6. Points for a major win
If the winning team scores more than the GD, you can give them a point. (Not recommended, as running up a score is generally seen as bad sportsmanship, but it is there if you want to use it.)

7. Points off for a Red Card
Select the number of points off for each red card. The expected is 1, but if you want to make sure a red carded team does not advance, you can select more. You will need to click on the red card icon in the scoring module for the game and enter in the number of red cards the team was given.

8. Max Goal Differential per Game
The default is 3, but 4 and 5 is also pretty common. Select whatever yur rules establish.

9. Tiebreakers allowed
Always keep Points as the first. While technically not a “tiebreaker,” it should always be first to establish the correct calculation.

Points
Wins
Head to Head
Goal Differential
Fewest Goals Allowed – Net (limited by the Max GD)
Fewest Goals Allowed – Gross (not limited by the Max GD)
Goals For – Net (limited by the Max GD)
Goals For – Gross (not limited by the Max GD)
Shutout Points
Penalty Kicks
Coin Toss
Not Used

Regardless of whether or not you use the Net setting, the actual score, GF, GA will display. You may choose to only enter scores to the max GD on your scoring, to not reward teams for running up a score.

Purge Cached Standings
In order to preserve server resources, your standings calculation files are cached, instead of recalculating every time someone visits the standings. When you updates scores, they will automatically manage. But if you change the standings calculations, you should leave this checked as you update the Standings/Tiebreakers Settings. (when we roll your Scheduling Module over after your deadline, we refresh these settings as a standard procedure)

When you change teams from one division or another, it’s always best to check the same box you will find on your Publish Schedule Tool. You can also force a purge in the Scoring Module by recalculating the standings for a specific division.

SCHEDULING MENU
00: Overview
01: Set up tournament divisions
02: Set game times and dates
03: Set up venues and playing fields
04: Create Placeholder Teams
05: Placing Teams into Tournament Divisions/Groups
06: Update and/or review your tie-breaker rules.
07: Schedule games by division
08: Review and publish
09: Making Changes to a Schedule

07: Schedule games by division

Editing in progress

Now you are ready to schedule your games.
First, select the Build/Edit Game Schedules from the ActionMenu and click GO! If you have divisioned and seeded your teams properly, defined your divisions, built your placeholders, you should see a grid like this, with buttons to schedule properly divisioned and seeded teams:

Schedule grid

When a schedule for the division has been built, you will see an Edit Schedule button instead.

Start with the divisions that are going to need the widest possible game separations, like your 5-team divisions. You will need to make sure you have one of the games for each day in the middle of the day, then the other two at the other ends of the day.

My preferred set up looks like this:
Scheduling Viewport

Open up the field grid for each day in a separate window using the blue calendar icons at the top of the pairings along side the pairings view for that division so you can see your open fields, etc. After you commit a schedule for that day, refresh each grid view to make sure the game tiles are positioned where you want them and there are no conflicts. It is safer to check each division as you go, instead of committing games in bulk and then finding you have conflicts.

SCHEDULING MENU
00: Overview
01: Set up tournament divisions
02: Set game times and dates
03: Set up venues and playing fields
04: Create Placeholder Teams
05: Placing Teams into Tournament Divisions/Groups
06: Update and/or review your tie-breaker rules.
07: Schedule games by division
08: Review and publish
09: Making Changes to a Schedule

08: Review and publish

Once you have your schedule set, you should review it carefully before publishing it. Catching mistakes now reduces confusion dramatically, even if you need to delay publishing beyond a “deadline.” Be sure to post a message on your front page letting teams know when to expect the schedule. Also — and this might be a bit controversial — you should delay publishing a schedule until the last possible moment. Teams were committed to the entire weekend when they applied and conflicts with other activities (or multiple team coaches) are theirs to resolve. Do not take on their problems. (nowhere does the popular TikTok phrase “not my circus, not my monkeys” apply than a schedule conflict. …)

Tools:

  • Audit the listing
  • Click on the Game Counts link in the gray bar. (if you don’t see it, the link might be turned off for your event. Just holler.) It gives the number of games assigned per team and the time between games on the same day.
  • Look at the calendar grid by day and make sure there is no red conflicts or game overlaps. You can see where each coach with multiple teams is playing as well as where all the games are for a single division.

That said, publishing a schedule is straightforward.

  • In the Scheduling Module>Publish/Un-Publish the Game Schedule>GO!
  • On the left side, select Publish for ALL Days
  • Check “Purge cached standings files”
  • Click on Go!

For more granular publishing by day, usually needed when your event spans multiple weekends, you may wish to publish only for a specific day. In that case, you would select “Publish the Game Schedule” and check only the days you want published. It’s always a good idea to check “Purge cached standings files”

SCHEDULING MENU
00: Overview
01: Set up tournament divisions
02: Set game times and dates
03: Set up venues and playing fields
04: Create Placeholder Teams
05: Placing Teams into Tournament Divisions/Groups
06: Update and/or review your tie-breaker rules.
07: Schedule games by division
08: Review and publish
09: Making Changes to a Schedule

09: Making Changes to a Schedule

Nobody likes to makes changes to a published schedule. Teams hate it, referee assignors hate it and most likely, as a tournament director, you most of all hate it. But sometimes, it cannot be avoided.

To avoid making changes, publish the schedule at the last possible moment. Almost nothing good comes from publishing a schedule early. Teams sorta hate this, but they hate changes even worse.

Do not take changes lightly. Every change affects at least four other teams. You will never be seen a hero for making changes.

Depending on how extensive your changes are, you may wish to unpublish the schedule while you re-work it and then publish it when done. For small changes like game times, field switches, etc, just do the changes and re-publish just to level things out.

If you chose to unpublish the schedule, you should try to minimize the “panic” from teams as much as possible by posting a message to the front news, saying the schedule is unpublished due to a few changes and will be active by [insert date/time] Teams will still email you in a panic, but as long as you have made a good-faith effort to keep them informed, you needn’t worry too much about their “panic.”

Making changes with a team change-out

First, if you get a team to replace the team that dropped, that is the best case scenario.

In the Team Applications Module:

  1. Team Applies through the application form. The application will come over as Waiting/Fees Waiting.
  2. Mark the OUTGOING team as Withdrawn. Update the NEW application as Accepted/Fees Pending, Paid, Whatever your deal is with the team, Update the discounts for the correct amount.
  3. Place the team in the correct Division and replace the seed with the outgoing team seed.

In the Scheduling Module:

  1. Build/Edit Game Schedules
  2. Click on the Edit Schedules for that division
  3. The Team that was been Withdrawn will show up with the flag on their games. Edit each game and replace them with the new team. If you would like to notify the teams of the change (teams probably already know, though) you can check the “Flag Affected Teams for Broadcast” box. That puts the team affected in a teamp group for you to send out a broadcast later.
  4. Publish the Schedule for ALL Days, making sure to check the box to Clear the cache on standings.

In the Team Applications Module: (Optional)

  1. Send a message to the affected teams. If you checked the “Flag Affected Teams for Broadcast” you will notice a line in red right above the GO! button. Check that, hit GO! and just the teams affecred will appear. Once you send the message, the line will clear.

Be sure to notify the referee assignor if necessary. Usually, a team change is not a concern.

Making changes with a format change, team drop/add

Ok, that’s the easy part. Also, changing times, venues, etc but the game format and the teams don’t actually change, is pretty easy, too. Just click on the Edit button on the game line and make the changes. If you would like to then send a message to all the affected teams, make sure you check the “Flag Affected Teams” and follow up with an email from the Team Applications Module. And the referee assignor! Don’t assume they know. If they check the settings in their Referee Module, they can get an alert on every change as well as disable the game delete, so the rule of thumb is to coordinate closely with your referee assignor! No refs; no game.

More than often, though, you will have a team drop (or add) completely changing the game format, the pairings, times, fields. Clearly a headache. But, not unmanageable.

  1. Mark the team Withdrawn. In the case of an addition, mark the team Accepted, put it in the right division and seed properly.
  2. Set your division format properly so the pairings will line up better.
  3. If you are going from a 2of3 to a 1of5 or a division format that did not have Finals and you need placeholders, make sure you add them or edit the existing one so they make sense. If your new division is a true Round Robin and you won’t need the placeholders, you can just let them hang in there… if you don’t use them, they won’t hurt just being there.

Here you have a choice to make. If you are good at moving stuff around and editing things on the fly, awesome! Just make the changes to the existing games; pairings, field assignments, times, dates, etc and deleting games you don’t need and adding new games.

I’m not good at that, so I just delete all the games and start over scheduling the division like it was brand new. Once all the games have been deleted, go back to the Build/Edit Games screen and the button will have changed rom Edit Schedule to Ok to Schedule (assuming you set the game format, division and seeding correctly.)

  1. Build/Edit the game and click on Edit Game Schedule. Reseed if needed.
  2. Schedule as you did originally, except the new format will be used.
  3. Publish the Schedule for ALL Days, making sure to check the box to Clear the cache on standings.

When you delete the games and set up new games, you will then need to notify all the teams in that division that a new schedule has been written because a team dropped, added, etc. Keep the message short and direct.

Reminder

Coordinate closely with your referee assignor! No refs; no game.

SCHEDULING MENU
00: Overview
01: Set up tournament divisions
02: Set game times and dates
03: Set up venues and playing fields
04: Create Placeholder Teams
05: Placing Teams into Tournament Divisions/Groups
06: Update and/or review your tie-breaker rules.
07: Schedule games by division
08: Review and publish
09: Making Changes to a Schedule

What is a division

The most common term youth soccer has complicated is the the definition of a “division.” This is how we define it at TourneyCentral.

A division is a group of teams that advance to win a trophy or an award at the end of pool play, quarters, semis and a final.

Many leagues and events divide groups into age-only divisions, then levels or flights. These are irrelevant within the tournament division definition.

Let me explain,

As a soccer tournament, you don’t know how many teams will apply, what their age distribution, their skill level, etc. will be. You put out the invitation, do your marketing, set up the Application Groups with ages, fees and formats but at the deadline close, you create the tournament with the teams you have, not the teams you may want.

Sometimes, you will have a glut of teams in one age group necessitating multiple “flights” like Gold, Silver, Bronze, etc. within an “age group.” Sometimes you may have to combine teams of different age groups to create a division, such as HS teams U15+ into a U19 division.

Regardless of how you combine teams, when you set up that group that will play together and ultimately compete against each other for the final award (trophy, medal, bragging rights, etc.) that is a DIVISION.

Once you place teams into a TOURNAMENT DIVISION, there are no “age group” divisions, only tournament divisions. You may use age as a factor for seeding and playing a team up (never down.. that would be against the rules) but there are no age group “divisions.”

Also, we do not support “cross division” play, for example, a highly seeded U12BoysSilver will cross and play low seed U12BoysGold. If you need this type of play, you should then place ALL the U12Boys into one division, but multiple groups. Cross-over is defined as a cross play to another GROUP (A, B, C, D, etc) during pool play, like a 2 of 3 group.

Setting up tournament divisions in the Scheduling Module

What seeding do you use per format

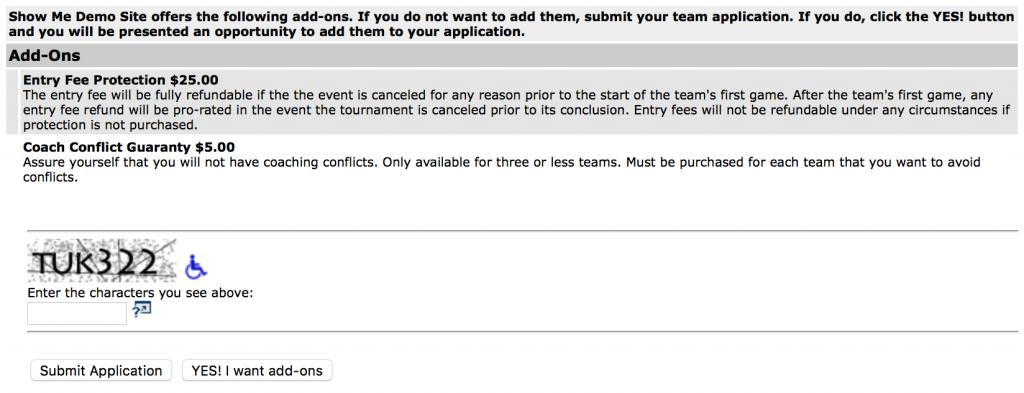
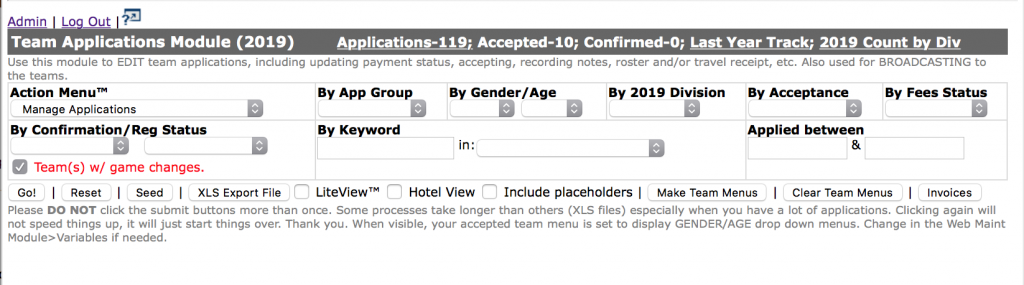
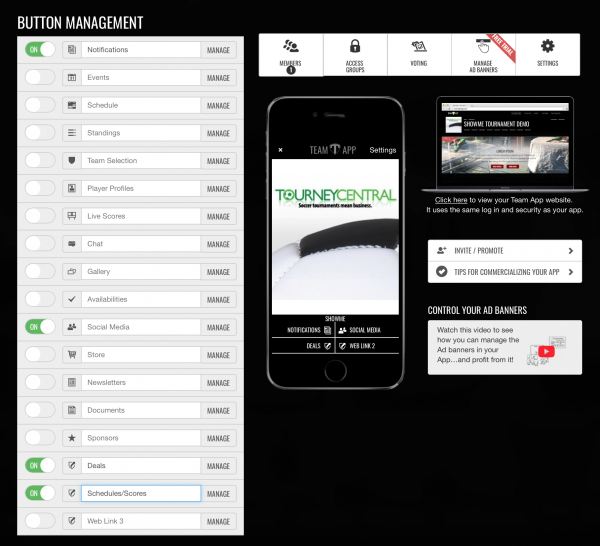
NOTE: As of Jan 1, 2017 we will no longer support the A1, A2, B1, B2, etc format of bracketing/groups. If you use this notation format, please prepare your scheduling to use the seed numbers for pairings by familiarizing yourself with the pairings below.

Here are the seed numbers in each group the software uses for scheduling.
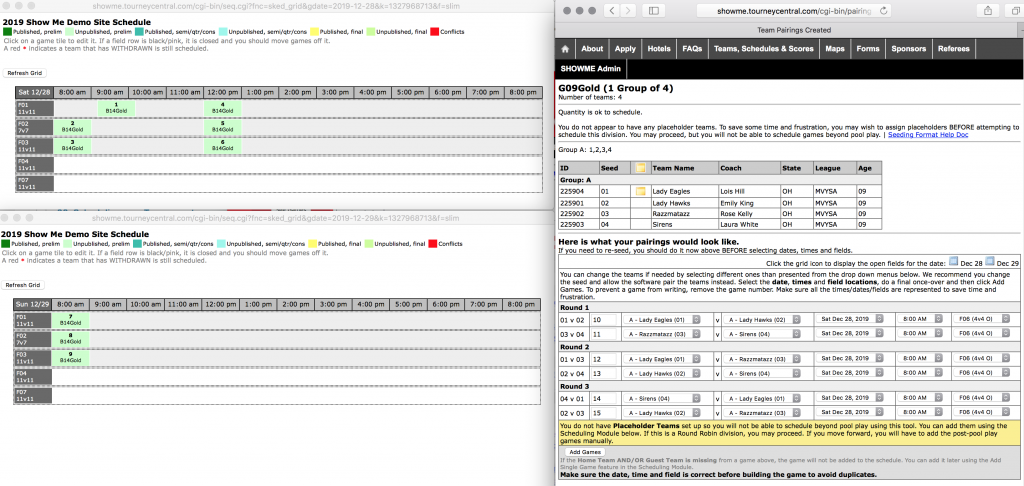
1 Group of 4:
Group A: 1,2,3,4
Round One: 1v2, 3v4
Round Two: 1v3, 2v4
Round Three: 4v1, 2v3

2 Groups of 4:
Group A: 1,4,5,8
Group B: 2,3,6,7
Round One: 1v4, 5v8, 2v3, 6v7
Round Two: 1v5, 4v8, 2v6, 3v7
Round Three: 8v1, 4v5, 7v2, 3v6

3 Groups of 4:
Group A: 1,6,7,12
Group B: 2,5,8,11
Group C: 3,4,9,10
Round One: 1v6, 7v12, 2v5, 8v11, 3v4, 9v10
Round Two: 1v7, 6v12, 2v8, 5v11, 3v9, 4v10
Round Three: 12v1, 6v7, 11v2, 5v8, 10v3, 4v9

4 Goups of 4:
Group A: 1,8,9,16
Group B: 2,7,10,15
Group C: 3,6,11,14
Group D: 4,5,12,13
Round One: 1v8, 9v16, 2v7, 10v15, 3v6, 11v14, 4v5, 12v13
Round Two: 1v9, 8v16, 2v10, 7v15, 3v11, 6v14, 4v12, 5v13
Round Three: 16v1, 8v9, 15v2, 7v10, 14v3, 6v11, 13v4, 5v12

5 Groups of 4:
Group A: 1,10,11,20
Group B: 2,9,12,19
Group C: 3,8,13,18
Group D: 4,7,14,17
Group E: 5,6,15,16
Round One: 1v10. 11v20, 2v9, 12v19, 3v8, 13v18, 4v7, 14v17, 5v6, 15v16
Round Two: 1v11, 10v20, 2v12, 9v19, 3v13, 8v18, 4v14, 7v17, 5v15, 6v16
Round Three: 20v1, 10v11, 19v2, 9v12, 18v3, 8v13, 17v4, 7v14, 16v5, 6v15

6 Groups of 4:
Group A: 1,12,13,24
Group B: 2,11,14,23
Group C: 3,10,15,22
Group D: 4,9,16,21
Group E: 5,8,17,20
Group F: 6,7,18,19
Round One: 1v12, 13v24, 2v11, 14v23, 3v10, 15v22, 4v9, 16v21, 5v8, 17v20, 6v7, 18v19
Round Two: 1v13, 12v24, 2v14, 11v23, 3v15, 10v22, 4v16, 9v21, 5v17, 8v20, 6v18, 7v19,
Round Three: 24v1, 12v13, 23v2, 11v14, 22v3, 10v15, 21v4, 9v16, 20v5, 8v17, 19v6, 7v18

2 Groups of 3:
Group A: 1,3,5
Group B: 2,4,6
One crossover game in each round.
Round One: 1v3, 5v2, 4v6
Round Two: 1v5, 3v4, 2v6
Round Three: 2v4, 1v6, 3v5

2 Groups of 3 NC (No Crossovers):
Group A: 1,3,5
Group B: 2,4,6
No crossover game in each round.
Round One: 1v3, 2v4
Round Two: 1v5, 2v6
Round Three: 3v5, 4v6
Two Consolation Games, One Final
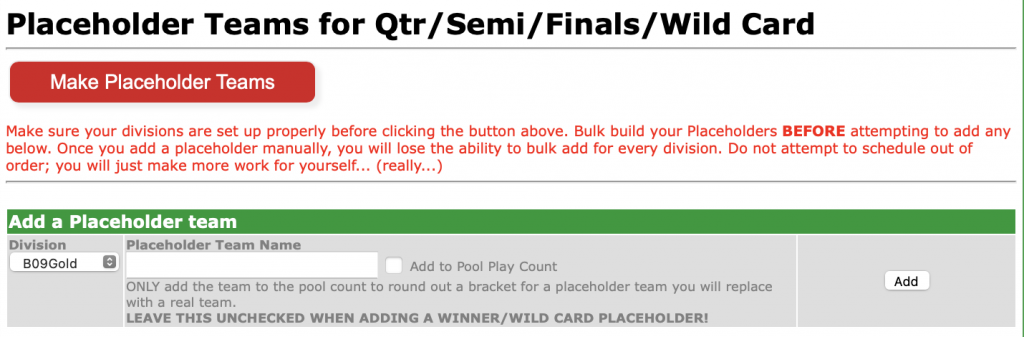
When Placeholders are built, consolation will be selected under extra games. Third Place A v Third Place B; Second Place A vs Second Place B will be assumed and build as placeholders, but you can pair them any way you wish.

4 Groups of 3:
Group A: 1, 8, 9
Group B: 2, 7, 10
Group C: 3, 6, 11
Group D: 4, 5, 12
One crossover game in each round. A crosses B, C crosses D
Round One: 1v8, 9v2, 7v10, 3v6, 11v4, 5v12
Round Two: 1v9, 8v7, 2v10, 3v11, 6v5, 4v12
Round Three: 2v7, 1v10, 8v9, 4v5, 3v12, 6v11

1 Group of 6:
Group A: 1,2,3,4,5,6

1 Group of 5:
Group A: 1,2,3,4,5
Round One: 1v2, 4v3, 5v1, 3v2, 4v5
Round Two: 5v2, 1v3, 2v4, 3v5, 1v4
You may wish to schedule your mid-day matches FIRST, then the first and last games as far out as possible to ensure adequate time between games for each team. To record a winner/finalist to this format, add a ghost game to the schedule when you are finished.

2 Groups of 5:
Group A: 1,3,5,7,9
Group B: 2,4,6,8,10
Round One: 1v3, 1v7, 9v3, 2v6, 2v8, 10v4
Round Two: 7v5, 5v3, 9v1, 8v10, 6v4, 10v2
Round Three: 5v9, 3v7, 1v5, 7v9, 6v10, 4v8, 2v6, 8v4

10-Team:
4-3-3 groupings
Group A: 1,6,7,10
Group B: 2,5,8
Group C: 3,4,9
B & C play crossover games.
Round One: 1v6, 7v10, 2v4, 8v3, 5v9
Round Two: 1v7, 6v10, 2v8, 4v5, 3v9
Round Three: 10v1, 6v7, 3v5, 2v9, 4v8
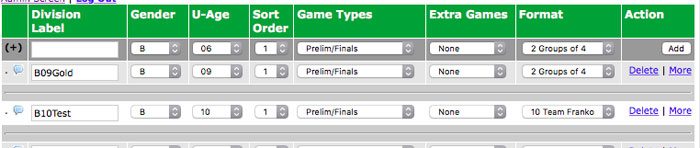
10-Team Franko:
Named for Marc Frankland, MTS Events
Group A: 1,6,7,10
Group B: 2,5,8
Group C: 3,4,9
B & C play crossover games.
Round One: 1v6 7v10 2v5 8v3 4v9
Round Two: 1v7 6v10 2v8 5v4 3v9
Round Three: 10v1 6v7 3v4 2v9 5v8

1 Group of 7: (not yet implemented)
Group A: 1,2,3,4,5,6,7
Round One: 3v4, 5v6, 1v2, 2v3, 4v5, 7v1, 7v6
Round Two: 3v7, 1v6, 4v2, 3v1, 6v4, 7v5, 2v5
We strongly advise against a 7-team division, Please consider a 2of3 or trying to find that eighth team for a 2of4. You may wish to schedule your mid-day matches FIRST, then the first and last games as far out as possible to ensure adequate time between games for each team. To record a winner/finalist to this format, add a ghost game to the schedule when you are finished.

Peer Team Seeding

Your Admin Modules include tools that enable teams who have applied within their Application Group to give you feedback that may help you seed properly, especially when you have a lot of teams that have applied.

In short, once a team is accepted, they can log into their team application, click on a link which will give them a listing of the teams that have also applied within their Application Group, a drop down of seed numbers where they can rank each team and submit it to the tournament.

The seeding will appear on the admin side with the highest seed and the lowest seed given along with the median seed. In theory, the more peer teams who participate in the seeding, the better the seeding result. Of course, it is ultimately up to the tournament to assign the final seed to each team.

Setting up the Peer Seeding

You toggle Peer Seeding on in the Website Maint Module>Variables>GO!

You can also limit the teams allowed to Peer Seed to the local club teams only, but you must make sure the Host Team Club is set. You will see a warning if you attempt to set the limit when the host club is not set.

That’s it. To close out the Peer Seed (you may want to give the teams a small window to seed) simply toggle the Peer Seeding to Off.

Again, only ACCEPTED teams will be able to peer seed and only ONCE! They cannot go back and seed teams they did not seed the first time. Only one shot at it.

Viewing the Peer Seeding

When teams have received a peer seed, this will be visible in the Team Applications Module>GO! (or with search filters) and Team Applications Module>Seed
The peer seeding will show with the min-median-max seed along with the number of peer seeds the team has received.

Click on the median seed link to see which teams assigned which peer seeds.

A team cannot peer seed their own team.

What Peer Seeding Looks like to a Team

An ACCEPTED team logs into their Team Application from the front page using their TeamID. Once there, they will see a Peer Seed link at the top of their application.

A click on the link will pop up a window of the teams in their Application Group, along with a drop down menu of seed numbers.

Again, they will not be able to seed their own team.

They should choose the seed number for each team. It is preferable they assign unique seeds to the teams, but if they are unsure of a team, they may leave the seed blank. They can also assign the same seed to two or more teams they feel are all on par with each other, though this makes the peer seed less useful to the tournament.

Once they are comfortable with their seeding choices, they submit the form.

That’s it!

04: Mobile Ads

Now your teams can quickly view which advertiser has a mobile DEAL directly from the app view.

Here is what the DEALS view looks like on a smart phone:

When the user clicks on DEALS, they will be presented a list of advertisers you have marked DEALS in your Advertising Module. If the advertiser has a mobile ad attached to the record, a mobile phone icon will be displayed to the right of the listing. Clicking on the icon will display the full-sized mobile ad.

Mobile DEALS:
Technical Specs:
Your file MUST be .jpg or .gif
Your file name must contain ONLY alpha/numeric characters
Your file MUST end in either .jpg or .gif
Short names work best.
Your file should be SQUARE, 500X500px at 72dpi BEFORE uploading.
Files larger than 2 megs will be rejected.

Why square? Here is why.

Managing the Mobile DEALS ads
The mobile ads will only show up on the mobile app view. Everything else will remain the same on the DEALS view on the website. Here is how to manage an ad.

Navigate to your Advertising Module. If you need to Add a new advertiser/sponsor, you should do that now before attempting to attach an ad, one-page PDF flyer, record a sale or assign a club team.

Here is the icon bar to help manage the graphic material, along with the listing of what each is, in the order it appears.

LOGO UPOAD: Once you have the advertiser in place, upload their logo. the logo file should be resized to 100x100px at 72dpi, be in jpg format.

ONE-PAGE PDF FLYER UPLOAD: If the advertiser/sponsor wants to distribute a one-page flyer to the teams, attach it here. The original PDF will link and the page will be converted to a jpg file for display on the DEALS page on the web site. Make sure it is a one-page flyer and it is not larger than 2 megs (if you need help converting the file so it fits, we can help… just call or email) If there is a flyer installed, it will pop out when you mouse over the Show link.

MOBILE DEAL UPLOAD: If the advertiser/sponsor wishes to display a mobile ad on the mobile app screen for the teams, upload it. Be sure to review the technical specs above! If there is a mobile DEAL installed, it will pop out when you mouse over the Show link.

RECORD AN AD SALE: Make sure you have ad products in the system already defined. Click here to record the ad sale, whether artwork has been received, etc.

ASSIGN A CLUB TEAM: Some events divide up the potential sponsors to the individual club teams to avoid cross-selling. If your club uses this feature, you can easily assign a team as well as release dates, etc.

Releasing the One-Page PDF Flyer and/or Mobile DEALS
You can easily replace the files simply by uploading new versions. If you wish to release the graphic files altogether, click into the advertisers record, scroll down about 2/3rds of the way and check the boxes for the files you want to release.

Click on Update Record and return to listing at the bottom of the screen.

00: Best Practices for Entering Scores

The following are collected Best Practices for entering scores for your soccer tournament. Your procedures may differ based on the resources you have at hand, but for the most part, these are fairly universal.

1. Scoring a tournament is not a multi-tasking job
Dedicate one person to just entering scores. The morning of the first day may be a bit slow, but it will eventually back up and things will become stressful, especially right after the third round when group winners will need to be verified and teams advanced. Strong seeding all but assures many divisions will be tight.

2. Protect the scorekeeper
Protect the person entering scores at all costs. This person should not be identified to the general tournament-going public, the coaches and most definitely not the parents. If the scorekeeper can be in a remote, locked location, that is even better. Sometimes detailed calculations may need to be made when verifying teams that advance. An environment where the scorekeeper can concentrate will be needed.

3. Work with the smallest data set possible
At minimum, filter the games to enter scores by the current date. If you have multiple scorekeepers at different venues, agree to only filter games by the respective venue. This ensures each scorekeeper won’t overwrite the others’ entries. You may also want to filter by division and/or game time start.

Keep the “Hide Completed Games” option checked, unless you are correcting a score that has already been updated. If you do need to update a score that was previously entered, it is best to search just for that one game and update it. The scores will appear grayed out, but it is editable.

4. Accuracy above all else
You can get almost anything else wrong and the teams will forgive you except a game score. Double, triple check the score before committing to the update. If the score is illegible it is almost better to not enter it than to get it wrong (but nothing gets you email faster than an incorrect score, so it may almost be faster than trying to track down the game officials) Also, don’t take a coach’s word for the score and never a parent’s word.

5. Standings
The standings for each division are calculated ONCE when the score changes for that division and is written to a cached file. That way, we can serve up the standings quickly without each website visitor having to fire off a trip to the database and recalculate standings that have not changed. This is self-managing, meaning that the system will compare the last time a score for that division was updated with the date of the standings cache file with each visit. If it needs to, it will recalculate.

Any trip to a standings link from the admin side, however, will fire off a fresh recalculation.

When you enter the scores, the confirmation screen will determine which divisions have been updated and ask if you want to recalculate the standings for each division at that time. If you have time to do so, we strongly encourage you do. Recalculating standings at the time you enter scores is the most preferable, though not absolutely necessary to be done immediately. If your scorekeeper has some time between rounds, he/she can click on the “See All Division Standings” button and recalculate any division with a red dot.

6. Posting scores and standings
Many events are no longer posting scores and standings outside the HQ tent, instead relying on teams to be able to view them on their phones in real time. However if you choose to post, be sure to have a high-speed laser printer available (an inkjet is just way too slow) on-site. Click on the “See All Division Standings” button, scan down for any red dots and update those that need recalculating. Check “Include Schedules” and click “Bulk Print All Standings,” then send the web page to the printer. It will burst at each division.

If you have a fancy monitor (or two or three) you can send the scores to them wirelessly or via HDMI cable, depending on how your computer is set up. This is set in the Media Module and should be dedicated to one computer. In other words, don’t use your scorekeeping computer.

7. Advancing Teams
You rarely get a chance to recover from advancing the wrong team, so don’t do it. Only ONE person should be allowed to advance teams.

Select “Advance Teams” from the Action Menu™ and click GO! Any game that is not a pool/prelim game will be listed, with drop downs for the competing teams. You should first click on the “S” in the upper left corner to verify the standings. This will fire off a recalculation, just to make sure the latest scores are included. Verify all teams have played the same number of games and there are no 3-way ties. If the points are razor-thin close, you may wish to verify the scores on the schedule first before advancing the team. Sometimes, the calculations may not necessarily advance the team you want because the rules were mis-applied throughout the weekend or something else happened on the field that may disqualify the leading teams. Team advancement is intentionally not automated to give the tournament director final say on the advancement. Be sure to click “Update Teams to Advance” at the bottom and double check the public schedule for the teams.

8. Stay until the last score is in
Stay until the very end. Make sure all the games have scores. The last team to play is as important as the first team to play.

01: Entering Scores

1. Start by creating the smallest data set possible. At minimum, filter the games to enter scores by the current date. If you have multiple scorekeepers at different venues, agree to only filter games by the respective venue. This ensures each scorekeeper won’t overwrite the others’ entries. You may also want to filter by division and/or game time start.

Keep the “Hide Completed Games” option checked, unless you are correcting a score that has already been updated. If you do need to update a score that was previously entered, it is best to search just for that one game and update it. The scores will appear grayed out, but it is editable.

If the Scoring Module produces no games or an odd listing, make sure you have the filters cleared and set for what you need. If you are using the custom filter on the second row, you must enter the data AND the field you want to search. (the most common error is to select the time or game numbers without supplying the data on which to search. A soccer tournament is a busy place, it happens.)

2. Enter the score for the Home and Away teams in the appropriate box for as many games as you need. If you leave a score blank on either side, the game score will not save.

3. If you are tracking red cards for standings points, click on the red card icon to the left and enter in the number of cards per team.

4. If a team forfeits the game, select Forfeit from the drop down and enter the default score indicated by your rules (usually a 1-0, but some events are higher.)

5. Do a once over to make sure everything is correct and click “Update Scores” Scores will not update unless you click “Update Scores” to commit.

02: Advancing Teams

This function should be assigned to only ONE person at a time. If more than one person advances teams, they may over-write the other, causing some frustration. If more than one person advances, you should filter the games to only include one specific division.

1. Select “Advance Teams” from the Action Menu™ and click GO! Any game that is not a pool/prelim game will be listed, with drop downs for the competing teams. If the game description appears in red, the scores for all the Pool/Prelim games are not complete. You may still advance the teams, but you may may not want to rely on the posted scores for the results.

2. You should first click on the “S” in the upper left corner to verify the standings. This will fire off a recalculation, just to make sure the latest scores are included. Verify all teams have played the same number of games and there are no 3-way ties. If the points are razor-thin close, you may wish to verify the scores on the schedule first before advancing the team.

If your rules throw out the H2H on a 3-way tie, you can force a calculation that ignores H2H with the link to ignore the H2H. If you agree with the new calculation, apply the team pairings shown. If not, click the Standings link to the left to restore using H2H.

Sometimes, the calculations may not necessarily advance the team you want because the rules were mis-applied throughout the weekend or something else happened on the field that may disqualify the leading teams. Team advancement is intentionally not automated to give the tournament director final say on the advancement.

3. Both sides of the game MUST have a team selected or the game update will be ignored. You will not be able to advance FINAL GAMES until you enter scores for SEMIs, no SEMI advancing until QTRs are scored, etc.

4. Be sure to click “Update Teams to Advance” at the bottom and double check the public schedule for the correct teams display.

03: Standings

The standings for each division are calculated ONCE when the score changes for that division and is written to a cached file. That way, we can serve up the standings quickly without each website visitor having to fire off a trip to the database and recalculate standings that have not changed. This is self-managing, meaning that the system will compare the last time a score for that division was updated with the date of the standings cache file with each visit. If it needs to, it will recalculate.

Any trip to a standings link from the admin side, however, will fire off a fresh recalculation.

When you enter the scores, the confirmation screen will determine which divisions have been updated and ask if you want to recalculate the standings for each division at that time. If you have time to do so, we strongly encourage you do. Recalculating standings at the time you enter scores is the most preferable, though not absolutely necessary to be done immediately.

If you have some time between rounds and you have not been recalculating the standings immediately after updating the scores, you may want to click on the “See All Division Standings” button and recalculate any division with a red dot.

Only Prelim/Pool games will be use to calculate the standings. No Fourth Round, Consolation, Post-Pool (Qtr, Semi, Final) games will be included in the calculation. If you are running a round robin with fourth round games that ultimately decide the winner of that division, you may wish to change the games to Prelim type games.

A coach/parent claims the math is wrong
The math is right. It has been “battle-tested” over 15+ years under every scenario possible by hundreds of tournaments.

What is more likely happening is the coach/parent does not agree with the calculations, doesn’t understand or is deliberately misinterpreting the nomenclature and is using the confusion of the tournament as cover to get you to give them an advantage. Their math arguments may sound legit and they will talk fast, but they would be wrong. They are hoping to sow doubt in your mind.

Regardless, you should never change the tiebreakers once you have set them after your event has commenced. Even if they are set inconsistently with your rules, every team will have been scored the same, so there really is no advantage to one team or the other.

If you decide to change the standings mid-tournament, set the new tiebreakers, making sure the “clear cache” is checked. Once you update, immediately go to your Scoring Module and recalculate every division. (not ENTIRELY necessary, but this will recalculate based on your changes, elimiating any inconsistencies as soon as possible.)

If you have set rules that the tiebreaker module cannot accommodate (not likely, but possible, especially if you are being creative) or if you don’t agree with the software math, you have two choices:

  1. Live with the software rules as close as possible and edit your rules.
  2. Turn off the standings display and calculate everything by hand.

Best practices, though, is if you are changing your tie-breaker rules from a previous year, it is best to TEST them FIRST before the tournament begins.

Note: If you feel we should add a tie-breaker rule, we will consider it. Simply complete this form and describe in detail how you wish to see the math. However, we will not — under any circumstances — re-write software rules while your tournament event is going on. Please plan and test your rules with lots of advance time accordingly.

How do I embed content from my Facebook Page?

Facebook is the most popular social media platform, so we will show you how to embed content you are posting from your tournament event PAGE (not a personal profile. If you are using a personal profile, you really should create a PAGE to get the maximum benefit of all the available tools.)

Other social platforms are similar and make the embed feature a lot more visible.

1. Log into facebook and post a story with photos, videos or other links.

2. Find the down arrow in the upper right hand corner and click down the menu. Select the EMBED menu choice.

3. A modal dialog box will show up with the embed code. COPY THE ENTIRE CODE.

4. Create a new FRONT PAGE NEWS story or edit your ABOUT page in your Web Maintenance Module. PASTE the line of code where you wish the Facebook content to appear. The embed code can stand alone in the story, but be sure to add a headline, dates and excerpt so your story appears properly on the page.

That is all there is to it. If you edit your Facebook post, the content on your website will change as well. If you remove your content from Facebook, however, you should remove the news story or line in your ABOUT page as well or it will show up as a broken link.

For optimal load times on your website, you should limit embedded content to 1-2 stories on the page.

Where are the media galleries?

On your social media accounts.

You just don’t need them because your audience no longer wants them on your site. They want photos and videos in their own social streams, which means photos and videos should now be living on your social accounts.

The website needs to give the who what where when why and be the authoritative voice for the your tournament; also, for operationally critical data (sponsors, applications, schedules.) The other media stuff needs to live on the outposts like Facebook, Twitter, Instagram, Periscope, Snapchat etc with the website simply validating the authenticity of the content. The outposts are where people live now, wanting your tournament to meld into the rest of their lives, not the other way around. 

Embed to your website, don’t upload.
Most social media accounts will enable you to embed your content into your web site. You can embed photos, videos, FB posts, etc onto your Front Page News and your About Page on your TourneyCentral website.

By embedding your content, you take advantage of being able to share your content across different social platforms as well as being able to edit the content from a single point, i.e., FB or Instagram. You will also see more traffic to your content because users will be able to more easily share with their social groups in the communities they already feel comfortable in, i.e., Facebook, twitter, YouTube, etc.

Since Facebook is the most popular social media platform, we’ll show you how to embed a post from your event page. Other platforms are similar, many actually easier because they make the embed choice more visible.

Embed judiciously.
Choose the content you want to embed carefully. Use embedding to highlight the event, not host a complete gallery onto your about page or front page news. You’ll find one or two carefully chosen photos or videos will go further than dozens of seemingly random photos and videos. Your pages will also load quicker if they are not hosting a lot of heavy graphics.

Watch the conflicts
When embedding content, make sure you do not provide conflicting information or alternative ways of “applying” to the event. For example, you may think embedding an event calendar post is helpful to a team applying, but they may think that by clicking “Yes, I’m attending” they have applied to your tournament. Think through how users will interact with your embedded content. It is best if you embed photos and videos and let the rest of your website handle the business part of your tournament. (When posting calendar events on your social outposts, please be clear about how a team applies. NEVER ASSUME they know what to do and how to do it.)

Starting up social for your soccer tournament
You may find these resource helpful for setting up and maintaining social media for your soccer tournament:

Send out an email with graphics, styled text or attachments

Both the Marketing Module and the Team Application Module can send out HTML-formatted emails. However, the functionality is very basic and requires you know some basic HTML tags such as italic, bold, img and links tag if you are doing anything more complicated than sending out an email with your header and colors. Also, if the message absolutely needs to get through, you will have more success sending as a text-formatted message as graphics and links are a red flag for spam. (no email is guaranteed to get through, but text-only gets there more frequently.)

The email modules are intended as MESSAGING services to your teams, not full-blown email marketing programs. There are entire companies set up to do that far better than we could ever hope to be. In our defense, these email marketing companies can’t manage soccer tournaments either!

Our favorite is Mailchimp, but Constant Contact is a favorite as well. You can use these services as basic email marketing, but we also recommend you hire a graphic designer to design your emails. Believe us, you WILL stand out as extraordinary if you move your graphic email marketing beyond basic volunteer-generated emails.

To use a third-party service, first export your team or marketing list as an XLS document. Read the CSV requirements of the service you wish to use and make a CSV document in XLS from your export document. Upload that as your distribution list and send from there.

Sending an email with an attachment
To send an attachment, you would send an email with a LINK to an attachment. Attachments send up spam filter flags more than any other single element in a bulk email and will hurt your ability to contact the team. Here is how you do it.

1. UPLOAD the PDF file you wish to “attach” into your Website Maint Module>Forms for Registration and General Use like you would normally for any other form.

2. Make note of the /pdf/FILENAME.pdf under the Link column

3. Make the link in your email like: http://yourtournamentdomain.com/pdf/FILENAME.pdf

4. TEST IT by copy/pasting it into a web browser to make sure it works.

5. When you send the email, the direct link to your file you want downloaded will be built in the user’s email.

6. MAKE SURE you include the http:// or https:// part and make sure it is on its own line and you do NOT add punctuation like a period or comma at the end of the URL.

Using the HTML tools in TourneyCentral
Assuming we have not yet deterred you and you have the requisite skills and time to create and test (test, test, test and test) the HTML mail you wish to send out, here is how to do it using the marketing module (the Team Apps Module works the same way except the loginID is displayed and the Remove Me is dectivated)

1. Filter the list you wish to send to (last year’s participants is the most common)

2. Check the teams you wish to send to. (or Select All and uncheck the ones you don’t want)

3. Select HTML Mail function from the drop down menu.
mktg_select

4. Complete all the required fields and your message. DO NOT PLACE ANY HEADER TAGS INTO THE MESSAGE! Your website flag, background and all will be included by default. If you used an HTML generator like Word (please don’t) remove EVERYTHING above and below the tags, including the body tags. Only basic HTML tags are supported (italic, bold, img and links)

mktg_message

  • A. Check the team
  • B. Message with basic tags

5. Send your message when you are satisfied with the result. Here is what your message looks like.

mktg_overview

  • A. Your website header to denote brand continuity
  • B. Team Name, Message with styled text
  • C. An image with the img tag, alignment, size, spacing…

Again, crafting a compelling HTML email is a skill. If you simply want your website flag atop your message, just type in a text message as you would for a TEXT-ONLY email and it will be included as styled.

If you have the skills, by all means, create.

If you still want an HTML email but you need drag and drop, WYSIWYG interfaces, etc, check out MailChimp or ConstantContact.

Forwarding a domain from your registrar

We are implementing https on all *.tourneycentral.com properties soon. In order to take advantage of that if you own your own domain name, you will need to configure your DNS slightly differently at your registrar. Instead of directing the web space to an IP address, you will be FORWARDING if you would like your domain to remain consistent across your website.

1. Secure the internal *.tourneycentral.com URL from TourneyCentral. Most likely, it will be the same as your temp address issued to you when you first set up your site, though it may have changed.

2. Log into GoDaddy (or your registrar… if you need help with this, you will need to call them directly. These instructions are similar, but all registrars handle things a bit differently)

3. Under the DNS Tab, look for the FORWARDING link. Click that.
screen-shot-2016-11-11-at-3-04-04-pm

4. Under the DOMAIN tab, click on the ADD FORWARDING button
screen2

5. Fill in the internal *.tourneycentral.com URL in the main field. Select http:// and we will manage it to https:// on the site when we need to… Select Forward only
screen3
MASKING HAS BEEN DEPRECATED BY GOOGLE AND GODADDY. It might work, but it is not recommended.

6. DOUBLE CHECK that it is correct by clicking on the Preview link at the top.

7. Save EVERY PLACE it asks you to save. It may ask you to save more than once, so read the instructions carefully.

8. The forwarding can take 24-48 hours, though most are active within an hour or less. If it has been a day and your site does not forward, empty the cache (temp files) refresh your browser or open up a different browser, like Chrome or FireFox… sometimes things get sticky and need routing out. As a last resort, you may want someone from TourneyCentral to log into your account and double check the settings for you, but most often, the registrar is your best go-to.

Your tournament logo

To create your website header, we need a tournament logo. The header file on each TourneyCentral site has these parts. This helps us establish a consistent look and feel among all the events we host to let your teams know that it is a quality event.

While you are free to hire a graphic designer to create this header file, it is highly recommended that you allow our highly skilled artists to create it for you. This will insure that all changes in size — should it become necessary — will be handled seamlessly.

Here is a standard header file and its parts:

hed_parts

Size: The header file in 906px wide x 105px tall at 72dpi. The format is gif. This is current as of 2016.

Part A: This is the event logo that is consistent year after year. This could also be the hosting club logo. If you have a current logo, we can generally work with whatever you have, however, words are usually an issue. It should be designed to fit within a square aspect ratio, however, this should not mean “take all our graphic elements and shrink it down to fit into a square.” Again, it should be designed to fit a square. This will also help you create avatars for your various social media spaces.

The preferred formats, in order are:
1) Illustrator, layers.
2) Photoshop, layered
3) PNG with a transparent background
4) PDF
5) JPG

We can usually work with anything you have as long as you trust us to do a good job for you. (we will) But if something truly is unusable, we’ll let you know quickly. WE want you to look as good as possible so we will generally have some solutions to work with what you have. You run a tournament, not a creative shop and we get that!

Part B: The event name. Usually it fits on one line and we can use the fonts that are contained in your tournament logo, your club site or something that reflects the event name, look and feel. If we need to split it up into multiple lines, we will do that skillfully. You need it to be easily ad quickly read. So do we.

Part C: The web address. This is usually set in Helvetica Neue Black, 18pt but we adjust based on the event. It is always top, flush right and will be set in the color that makes the most sense for the event usually white or black.

Part D: Most times (not always) we will pick up some unique element from your logo or club site and screen it back to tie the whole header together. In the event we don’t have anything or the elements would be too busy as to be distracting, we may go with a generic soccer ball or net pattern.

Ghost Games

Sometimes, you wish to add a game but do not want it to appear on the public schedule. We call this a “ghost game.” You will also want to add a ghost game on a 5-team division or a pure round robin without a final, but may also wish to declare a winner of the division.

Your event may also be hosting a league game that can be played during your tournament, but you do not want this counting in the standings for the two teams.

To add a ghost game:

  • Scheduling Module>Build/Edit Game Schedules>GO!
  • Scroll to the Enter New Game; Add in the game details
  • Check the Ghost Game checkbox
  • Click on Add Game

If this is a 5-team or Round Robin where you want to record a champion/finalist, it is best that you number the game 0 and schedule it on the last day and the last time slot so it appears at the bottom of the game schedules in your admin area. (it will not appear on the public schedule)

When a champion and finalist emerge, score the game as 1-0 with the champion as the home team and the finalist as the guest team. The result will appear on the Champions table, available on the sidebar.

Editing/Deleting a Ghost Game
To edit a ghost game, click on the Edit button and edit as normal. You will not be able to make the ghost game visible. If you need to make it visible, you will need to delete the game and re-add it above, without checking the ghost game checkbox.

To force a Champion/Finalist on a 5-team or irregular format, score the champion team 1 and the finalist 0 on a FINAL ghost game.

00. What happens after my tournament?

With the internet, your soccer tournament is a 365/24/7 event. As such, your website will stay active for the current season until you tell TourneyCentral to roll it forward for the next. Make a commitment early for next year. Get your sanctioning forms completed, lock down the venue and the dates, sign the hotel contracts, get yourself on the calendar and turn your web site over to next year. Make it real as soon as you can.

Here is what you can expect until you roll your event forward for the next season.

Immediately following your tournament:

  • The application will be explicitly closed.
  • The preorder apparel flag in the left rail will be inactivated
  • The team login will be removed.
  • Any front page news that is NOT a thank you message will be expired to avoid confusion.
  • The countdown on the front page will be toggled to say “The [YEAR] [TOURNAMENT] has concluded.”
  • The current year teams and schedules will remain.
  • The referee schedules will be unpublished, the application link and login will be removed.

Approximately four months after your tournament:

  • The admin will be locked down and a link to request a roll forward to the next season will be put in place.

You should IMMEDIATELY FOLLOWING the conclusion of your tournament, export the team data, schedules and standings files as well as the information on team distribution, etc for your post-tournament report and community meeting such as CVBs who may wish to gauge economic impact. After about four months after your event, this area will be locked down.

Publishing brackets ahead of the schedule

You have different “flights” within age groups and wish to publish the tournament divisions (brackets) prior to working on the schedule to make sure you place the teams in the correct division to avoid teams asking for a schedule re-work.

IMPORTANT
First, in the Website Maintenance Module>Variables>GO! set your Accepted Team Listing to TOURNAMENT DIVISIONS.
Screen Shot 2015-09-09 at 7.53.49 AM

Once you have finished putting all the teams in the correct “bracket” (tournament division) then you simply press the Make Team Menus button in the Team Apps Module and the drop down menu of divisions will appear on the left rail and under the Teams… menu.
Screen Shot 2015-09-09 at 7.56.23 AM

Changes will all be live so if you are moving a few teams, just do it but if you will be moving a dozen teams or something like that, you may want to Clear Team Menus, move them, then Make Team Menus again just to be able to do it in peace without teams emailing you while you work.

00: The Webstore Basics

The Web Store is designed to integrate with the teams who have applied to your tournament AND have been accepted to participate. This is by design to prevent orders being processed by the general public, family in remote locations and orders that require shipping. There is also no multiple discount, early-bird pricing, coupons, etc. It is a basic pre-order system that allows you to take orders easily on-line and process the product for easy pick up during team registration or on site.

If you require any of the advanced features above, you have the option to set up a full-featured store and redirect your users directly from the store button on the side rail.

Some popular web stores are at Squarespace, Shopify and Square (might be good if you also use Square at your fields)

Many shirt vendors offer a store as part of their screen-printing services. You may want to check with yours.

Let’s get started with your Web Store Module >>>

01: Web Store; the team view

The following is what the Web Store looks like when a user clicks on the shirt graphic on the side rail. The list below outlines the various parts.

web store

A: If you accept credit card and have set up to process payments (PayPal is the native processor TourneyCentral supports,) the credit card graphics appear here. You do NOT have to set up to accept credit cards to use the store, however. You should set up your credit card processing and be ready to go before attempting to use the store. In fact, TourneyCentral has a “safety switch” we need to turn on the back end, just to make sure no orders are processed prematurely. Setting up your merchant account is done internally by you, your tournament or your club. TourneyCentral does not set up PayPal nor do we handle your money.

B: This is a thumbnail graphic of the apparel you are offering. A click on the See larger link opens up a larger graphic. A square format works best, with a max width of 450px at 72 dpi. Small files will load faster. (If you need help resizing files, just ask!)

C: This is the description, pricing, quantity, sizing and color options.

D: This is the cart. As the user adds various products in color and sizing options, it builds. If the user enters in the wrong qty, size or color, they can delete it and re-add to the cart.

E: This is the check out portion of the cart. This web store is limited to teams that have been accepted into your tournament. It is NOT a general public, full-featured cart. Therefore, only the teams that have been accepted will show up in the drop down. If the drop down is empty because you have not yet accepted teams, you may display the offerings, but teams will not be able to order. This is to prevent teams who have applied but may not have been accepted from ordering and paying, forcing refunds.

F: Any forms or flyers that have been uploaded into the Website Maint Module>Forms>GO! area and flagged with the Tshirt flag will appear here. We strongly recommend that even if you are using the Web Store that you provide an order tally sheet and/or sample photos so the team rep can use to gather orders from the team at practice, etc. The system, however, will gather all the individual orders together and group by team even if entered singly by individual parents, rather than by a team rep.

02: Web Store; the admin, entering items

You begin by setting up items in the Web Store Module.

Select Manage the Store Items in the Action Menu. Click Go!

webstore_product_admin

Here are the various pieces, along with their settings:

A: Like the other modules, you enter a new item on the top line. Enter a product description. You should make this as short as possible, like SS TSHIRT, LS TSHIRT, etc. Group like product together whose only differentiation is color and size. (If you price your Y size shirt differently, you will have to set those up as different product, though.)

Populate the sizes by separating with a comma, like XL,L,M,S,XS They will appear on the menu in the order you place them.

Populate the colors by separately with a comma. USE SINGLE WORD COLORS and ONLY ALPHA CHARACTERS, like BLACK,WHITE,YELLOW,PURPLE,GREEN All caps is best, they will also appear in the order you enter them.

Enter the pre-order price and the on-field price. They may be the same. By default, the product will be visible. Click Add. The product will drop down into the list. Continue adding all the products until you are done.

B: Upload your graphic by clicking the upload icon (max: 450px wide. If you need help with this, please ask first!)

C: If you need to edit the item element, make the changes directly on the line and …

D: click the Update button. Only update one item at a time. Delete will make the item drop out of your store, so if you only want to make it invisible, check the Vis. checkbox and Update instead! If you Delete and decide you want it back, you will have to reenter the item.

Open a new window to the public side of your site and make sure your items appear correctly. You will have to turn on the store temporarily in the Website Maint Module by toggling the Display T-Shirt Button to “Display” and making sure your deadline is some time in the future. Toggle it back off when you are done checking the store set up.

webstore_button_admin

03: Web Store; the admin, managing orders

As teams enter orders, they will be be placed in the Web Store Module, grouped by team. Because orders can be placed be separate people, they will appear as line items with various names. But they will appear together. When payments come in, you will mark the orders paid by clicking on the Mark Paid link on the item line.

Here is the top line view of the orders.

webstore_orders_admin

A: A running tally of inventory counts.
webstore_inventorycnts_admin

B: The listing of items ordered. If filtered by Paid or Unpaid,the system will list what is selected. If left unfiltered, it will show all. (The orders marked paid will show the link Mark Unpaid.)
webstore_filter_admin

If a team requests a decrement or increment of an order, you can adjust this by clicking on the + or – link on the line. However, teams should be encouraged to submit an order for any additions to their pre-order. You can also delete an order by clicking on the Delete link… which is permanent.

NOTE: If you take credit cards for the pre-orders, the order will get written to the system regardless of whether or not the teams completes the payment to the credit card system. This is by design so that you can be flexible with your payments with some teams if you choose or to allow the team to pay alternatively if their card is declined, etc. It just makes sure you trap as many orders as possible without inflicting undue hassle on the team. If you have a strict credit card only policy, make sure you state this up-front, with the action you will take, i.e., delete the order, if the payment is not received within X days of the order. If you absolutely require payment by credit card with the order, you may wish to examine other more commercial e-commerce solutions such as Shopify, Squarespace, etc.

C: To create a pick ticket for a single team, click on the Pick link. If there is a published schedule, the team schedule will appear as well.
webstore_singlepicktkt_admin

D: Create an XLS Export file of all the orders.

Creating a payment screen

Some times, teams may not be ready to pay for the items when they ordered them, even after having been told they should have their credit card ready before they begin to order. As an admin, you can build a link for them and email it to them for their cart. If they split out their orders, you will need to send them multiple links… you can not combine carts.

On the listing, for items that have not yet been marked paid, there will be a PayPal icon to the left of the cart number.
– Click that to go to the payments page and copy the URL or right-click on the icon to save the link.
– Email it to the team member requesting the cart.

For carts/items that have been marked paid, the icon will not appear. Also, you must activate your PayPal account for other items in the Web Maint Module>Variables for the PayPal icon to show. The cart number that appears on the line gets sent to PayPal with the payments screen when team members pay with a credit card.

*Presidential candidates seemed as good a choice as any for fake, demo team names 🙂

Flagging Teams with Game Changes

You can choose to notify only the teams that are affected by game changes after you publish the schedule.

Edit the game as you normally would. At the bottom of the edit game screen, there is a checkbox to flag the teams affected. It keeps track of both the teams that will change and the teams that were originally scheduled, if you are changing team pairings… but mostly, it will be a time/location change…

NO AUTOMATED EMAILS ARE SENT OUT ON CHANGES! This allows you to bundle all the changes and then send out an email using the Team Apps Module as you normally would. If you are acting on several groups, like all field 10, then all field 13, then all teams in a division, etc, we advise you to bundle all like changes together. For example, do all the field 10 changes in a batch, send the email, then all the field 13 changes, send the email, etc… that way, you can be specific about what the change is. BUT, you don’t have to! You can make ALL the changes, then filter on the teams affected and send a generic email like: “Your games have been changed; please check your schedule now for the changes” or something like that…. your choice….

Game change notifications

When you have teams flagged from the schedule changes, you will see a new filter in your Team Apps Module called Team(s) w/ game changes. Check that and click Go! Only the teams that have been flagged will show up.

Check them, type in your email and send. The flag will then clear. It it STRONGLY recommended that you put in a Bcc: to yourself so you have ready documentation that you sent the email. The email will also be in the Team’s Message Center.

CLEARING THE FLAG WITHOUT SENDING AN EMAIL
If you flag teams on changes, but decide against sending an email, you can clear them just as you would marking them paid, accepted, etc from that top menu. Select that, check the teams, click on Mark Checked Records and the flags will clear. This is useful if you want to keep track of the teams prior to publishing the schedule, make a mistake and inadvertently check on changes … whatever the reason, you can clear all or some of the teams.

Online Registration using Google Docs/Gmail

The preferred method of receiving forms is via structured email. If you choose to create forms that allow uploads (using WooFoo or Google Forms*,) please be aware that you will be receiving personal information from persons under 13 years of age, through a website form and that carries with it certain obligations under COPPA and regulated by the FTC. We are not dispensing legal advice, however, so please consult with your legal counsel. We just feel it the responsible thing to do to let you know there may be prevailing laws and the main reason we do not allow file uploads onto our servers for registration data.

*Google Forms is free, but to upload forms, the user must first have a Google Account and be logged in. Google also warns you that the form should only be used by people you trust, so there is a danger a spammer will find your form and upload junk… lots of junk. Email attachments to an obscure email, published only to your teams is the safest route for attachments/uploads.
—————–

Many tournaments are moving toward receiving team registration documents electronically. Despite the appeal of replacing the in-person process with an electronic one, without a system, the process can rapidly get out of control. Here is our suggestion based on what we’ve seen work.

We suggest three web-based tools:
1. Gmail (strongly recommend a SEPARATE email that is used ONLY for registration materials)
2. Google Drive/Docs (Now Google Drive File Stream) or DropBox
3. If This Than That (IFTTT) (not really necessary, just nice to automate stuff)

TO DO NOW:
1. Log into your Google/Gmail Account you created for registration.
2. Download the Google Drive (or will be Google Drive File Stream) app (Mac or Windows, whichever you have) this allows you to manage the documents on your desktop and/or web especially if you are off line… it will auto synch when you are. You can also share the folders to other people so you can have some help wherever they are…

To find the Google Drive download, click on the gmail.com upper right, Account, then Data Tools, Manage your space, scroll to the Google Drive icon, click, follow the links.. (yeah, I know should be easier but… just trust me when you have this all set up, it will flow easily)

WORKFLOW:
1. Ask teams to attach their files to an email with the subject line:
GENDER AGE TEAMID (Nothing else. I would warn them that you WILL send back the email UNOPENED if they put anything else in the subject line.) Ex: BOYS 08 XXX141657865

2. Only COMPLETE registration packs. ONLY forms, no lengthy explanations of excuses as nobody is going to actually read the email, just process the forms. (Again, I would warn them you will send back the email, delete it, whatever if it is INCOMPLETE)

3. NO USE OF THIS EMAIL ADDRESS FOR ANY OTHER USE! That is what your online contact form is for.

If you have set up with an IFTTT account. If not, skip to Step 8
4. Email will come in and a recipe at IFTTT logs it into /GoogleDrive/IFTTT/Gmail/RegTracking.gsheet
This should be used as a tracking sheet of emails that have yet to be processed. Once you save the forms, delete the row. This will come in handy if other people are helping you.

5. Make a new folder named GENDER AGE TEAMID Give Google couple minutes to synch up and then save the files into the new folder by right clicking on them and downloading them into your Google Drive.

6. Verify the docs are complete, mark the folder green (or whatever color or symbol)

7. Enter the progress on a the master spreadsheet, if you choose.

8. Update your admin area to show which teams are complete or enter notes into the Registration Area to let the team know what is still missing, not compliant, etc.

The success of receiving documents electronically is to be BRUTAL with the rules. Complete packs, subject lines compliant, no other communications regarding anything else on this email address.

You can also set up filters and such in Gmail if you are a power-user, but for now, this is probably enough. When you get really brave, you can start using IFTTT to do all sorts of automated things.

You can create folders in your Google Drive or Dropbox folder to store the documents from the teams, then copy the link to include as part of the team record. You may want to use labels to indicate the status of the team registration. If you have a lot of teams, you may find it easier to track if you split up into girls, boys and/or age groups.

When you enter the copied link on the team detail screen, and it will build a link from the listing for quick reference.

Listing of the folders:

Link to the hosted documents:

How do I close a single age group, gender, division

Our stuff works more on a “soft close” model, where you flag certain age groups as closed, but if a teams really, really really wants to apply, they can. You of course, are not obligated to do anything with them, including accepting their payment, if you choose not to. This helps keep teams in a waiting pool easier if one of your early accepted teams drop out.

BUT, we have some options for closing specific groups.

Per Application Group
Team Applications Module>Applications Groups>Go!
Just put CLOSED or FULL in the Extra fields next to the groups you would like to close and click Update at the bottom. Make sure they “take” by looking at the menu labels to the right or at the drop down menu on the application form. This won’t prevent a team from selecting the division, but a big CLOSED on the line will make them think twice and email you before applying hopefully.

appgroupsfees

extra

Front Page
Web Site Admin Module>Front Page News>GO!
Put a running news story on which age groups/genders are closed. If you check the sticky, it will always appear as the lead story. If you click on Quick News, it will be placed in the middle of the front page. I like to reserve the Quick News for weather-releated and emergency news, but it’s your call. Just keep it updated as you close each age/gender

Hard Close
When you want to COMPLETELY shut down your application, just toggle
the Closed in Web Site Maint Module>Variables>GO! This will lock out your app, preventing teams from applying entirely…. and you from adding teams. You can always toggle it open, but we don’t generally recommend this unless you really, really want to closeout all apps.

hardclose

Date-based Deadlines
On day after your deadline (set in Web Site Maint Module>Variables>GO!) your application will toggle with a message that applications are CLOSED and teams will be placed on the Waiting List. Unless you hard close the app, they will still be able to apply in, but they are told to NOT send in their money unless asked to by you.. So, if you still have some age groups open after your deadline, either extend your deadline out further by hanging the date OR encourage those age groups to apply with a front page news story AND hop on an email back to the team quickly to get paid.

AFTER your tournament begins, your application form will lock down automatically as if you hard closed it manually.

Use any or all of these to manage expectations while also making it easy for a team to apply into your event.

04: Making a file to post scores and teams

Many events are no longer posting scores and standings outside the HQ tent, instead relying on teams to be able to view them on their phones in real time. However if you choose to post, be sure to have a high-speed laser printer available (an inkjet is just way too slow) on-site.

1. In the Scoring Module, click See All Division Standings

pdfscoring01

2. Scroll all the way to the bottom.

3. Click Bulk Print All Scores. Check include Teams if you wish to include the teams above the scores.

pdfscoring02

The file will build and burst at the — on each division. If you are using this file for your program, Save/Print as PDF. You may need to save each division as a separate single PDF for your printer.

pdfscoring03

4. Alternately, if you only need a specific division to update the posting, you can print just the one division by clicking “Print Scores” to the far rights on the division line.

My previous year’s schedule and team list is still on my site. Why?

A TourneyCentral site will always hold two year’s worth of data; the current year and the schedule year. Depending on where you are in the cycle, the years may or may not be the same. This is by design.

Roll Forward, but before application deadline:
Current Year = Application Year
Schedule Year = Previous Year

Roll Forward, but after application deadline:
Current Year = Application Year
Schedule Year = Application Year

The Schedule Year will be published along the left rail and under the Teams, Schedules & Scores menu. This is set to enable coaches and team reps who are thinking about applying into your event to see how you seeded teams, what sort of competition you had, what the score spread was, where the teams played, etc. Your last year’s schedule is your best marketing tool.

You can turn the team list and/or the schedules off for the site, though the Schedule Year will still be reflected in the header until your application date. If you accept Current Year teams, they will also NOT show in the menus until after your application deadline, though the status will be available in the team admin when they log in.

Deactivating Team Lists:
In the Team Apps Module, click on the Clear Team Menus button.

Deactivating Team Schedules:
In the Scheduling Module>Publish/Unpublish the Game Schedules>GO!
Unpublish the Game Schedule for ALL days>GO!

If you would like to just roll the dates forward to the Schedule Year immediately, just ask and we can do that for you. Please be aware that you WILL LOSE ACCESS TO LAST YEAR’S SCHEDULES, so you should download the XLS files BEFORE making a request. Once the Schedule Year is rolled forward, we will not retrieve scheduling data for you.

How do I manage the registration materials?

Using Google Drive File Stream and Gmail to receive materials

You can bulk mark the teams who have submitted their registration materials and are OK to play in much the same way you mark them paid.

1. In the Team Applications Module, select filter criteria, if known (Ex: Boys 10).

2. Click on the Go! button.

3. Select the “Registration OK” from the drop down menu at the top of the listing

4. Check the checkboxes next to the team(s) you wish to mark OK

5. Click the Mark Checked Records button at the end of the listing.

Before you mark the team OK, the default state is Incomplete.

Letting the teams know what is missing/incomplete
In the team detail screen you access by clicking on the team name, you will be able to enter what the team still needs in the note field right under the drop down status menu.

Your notes will display on the team application side when they log in.

When you mark the team OK, the notes will automatically clear. You do not need to clear them separately.

Sample import sked file

DO NOT USE THIS WITHOUT FIRST CONSULTING YOUR TOURNEYCENTRAL CONTACT!

If you are using your own scheduling software, we can import your schedule as long as you can create an export EXACTLY like the sample XLS sheet here.

Download the XLS

xlssked

You MUST complete every step of the set up using the TourneyCentral software and the code/divisions/fields etc MUST match EXACTLY with no case shifting or spaces.

Screen Shot 2014-02-21 at 3.41.05 PM

DO NOT USE THIS WITHOUT FIRST CONSULTING YOUR TOURNEYCENTRAL CONTACT!

Videos

Grandma and grandpa want to see their grandson Billy play in his first away soccer tournament. How will they find the right field and times Billy plays?

Fortunately, Billy's coach applied to a TourneyCentral soccer tournament so finding all this information was easy.
Billy's grandma went to the website, clicked on Schedules, found Billy's team name and got his schedule in seconds.

Marcy has just been named her club's soccer tournament director. She searches for the best solution to help her manage all the tasks that go along with hosting a soccer tournament.

Version 201401v1_1

Updates to the admin areas

Admin Messages Module
Moved the Tournament PulsePoint to a manual update, enabling faster login by all users. The SuperUser will be notified when the PulsePoint files need to be rebuilt and can with a one click button.

Delayed rebuild age from .32 to .64

Admin Login Page
Notice when the files are older than .64

Redirecting DNS

If you choose to own your own domain, you will need to point it to our web space. We use GoDaddy for our domains, so if you use another service, you should contact their tech support on instructions on how to do this.

You agree to:
– Pay for your fees
– Renew your domain
– Change the IP address when we migrate servers

If you allow your domain to lapse, we cannot help restore it.

You will need the IP address: 74.85.128.156

Here is how to do it in your GoDaddy account.

1. Log into your account. Once you are there, you will need to launch your Domains app.

dns01

2. Search for your domain using the search tool in the upper righty corner.

dns02

3. Once you are there, click on the DNS Zone tab.

4. On the Edit screen, click on the edit pencil and use 162.245.225.23 for the value. You should also consider setting up a TXT record for SPF, with the value v=spf1 mx -all to bind the domain as the only IP address email should originate. This may or may not cur down on spam or help prevent email from being sent to spam.
Screen Shot 2016-08-22 at 6.58.20 PM

When you have made the change, a RED BAR will appear, asking you confirm the change. Make sure you save the changes.

dnsedit

5. You can safely log out at this point.

GoDaddy cautions that it takes 24-48 hours to propagate the Internet, but it usually takes less than an hour for everything to connect up.

DO NOT, UNDER ANY CIRCUMSTANCES, DIRECT A DOMAIN TO TOURNEYCENTRAL WITHOUT FIRST CONFIRMING IT IS OK. We have stuff we need to configure on our servers to make sure it goes to the right place once the IP is directed.

Multiple domains

Sometimes you may want multiple domains to point to your tournament website, like a longer version or a plural version. We will set up ONE primary domain on our server, so you will need to redirect any additional domains into the primary domain on GoDaddy (or your registrar.) Here are instructions to do that on GoDaddy (you will need to ask your registrar if you use anyone else.)

1. Log into your account. Once you are there, you will need to launch your Domains app.

dns01

2. Search for your domain using the search tool in the upper righty corner.

dns02

3. Add Forwarding to your PRIMARY DOMAIN. Make sure there are no typos. Save the tab. Do not change any other setting.

addforwarding

4. Refresh and wait for the changes to take place. This could take from a few minutes to an hour, depending on how busy GoDaddy is. Check the secondary domains in your browser and see if they resolve into the primary domain.

5. If all went well, the DNS servers should have changed to GoDaddy servers and the forwarding will be set. If you have previously assigned the DNS to point to our servers or another server on the secondary domains, you may need to force a change. Click on the Manage link under the Nameservers and choose Standard, then save.

settingstab

6. As with most things DNS, you should wait a reasonable time period for it to resolve, 1-48 hours.

These instructions are current as of 2015-07-02. If GoDaddy makes changes, we will update this help file. If you notice they have changed before we can update, please call us before preceding.

Sending an email invite to last year’s teams

1. Log into your admin modules. Scroll to the Team Marketing Module.

2. Filter by checking Select only last year’s teams and Hide Deleted. Click Go!

Screen Shot 2014-01-14 at 1.43.19 PM

2. Check the Check All and make sure the Send Email is on the drop down menu. It is the default. The email will not be sent if no teams are checked.

Screen Shot 2014-01-14 at 1.43.35 PM

3. Scroll through the list and uncheck any team you do not want top send the email. These may be teams that are now too old, teams you would rather not encourage back, etc.

4. Scroll to the form at the bottom and complete. Be sure to copy/paste any links into a web browser to make sure they work. It will save you a lot of hassle with teams emailing you saying your link doesn’t work. Also, double, triple, quadruple check for typos. If you use MS Word to compose your message,make sure to strip out any weird characters like ” or rd, etc.

send screen

5. Be sure to print out a copy for your records.

Importing a Schedule from another program

About 30% of our tournaments use their own scheduling systems and we import their schedule in for them. It keeps everyone where they are comfortable. It just needs to be in the format of the XLS sheet attached which has really basic info. Most systems can export this info easily…

You should do everything in the Scheduling Dashboard except for the actual scheduling.

A few rules:
a. No additional info than is asked for. Don’t include team name, coach name.. etc. The TEAM ID (first number in your team export file — attached) will pick that up. Team 1 is the home team ID, Team 2 is the Visitor team ID.. even FINAL games should have team numbers from placeholders (Winner A, Winner B.. see team file)
b. There is NO ERROR CHECKING on import. You re expected to resolve all errors BEFORE the file over.
c. Make sure date field is date format, time filed is time format.. NOT TEXT.
d. Divisons, field codes and venues should be EXACTLY as they appear in your system. BU13WHITE or even BU13_WHITE is NOT the same as BU13_White. Case matters.
e. Once imported, all changes must be made using our editing tools on the site. We will not re-import the file. So, it is always best to hold the schedule as long as you can to make sure it is exactly as you want it. I only takes us about 3 minutes to import, assuming no errors on c and d. (we’ll send it back…)

If the team import is done properly and/or the setup is done carefully, these rules should not be an issue.. most problems are created by simple typos on setup…

Sample Schedule Export File (XLS)

How do I track which hotels team are staying in?

Tracking hotel rooms with 100% accuracy has always been a bit elusive. Sometimes the person applying to the tournament and housing the team are not the same person and this information is just simply not known by the main contact. Other times, the team will not book a block of rooms until they are accepted. There are also a lot of other reasons why this information is hard to get.

To get accurate information, you may want to consider working with a reputable housing agency and requiring a “Stay to Play” policy.

We have an optional reporting tool that we can turn on that presents an information form to the team between logging on and confirming participation. To turn the form on for your tournament, just ask.

It looks like this to the team when they log in.

We made it as frictionless as possible to avoid frustrating the head coach who may just want to confirm the team and doesn’t know so there is no error-reporting or required fields. But most people will give it an honest attempt.

While getting hotel info is important, we feel the form should not frustrate the coach out of confirming participation, or worst, confirming via a separate email which creates more work for you. Your housing coordinator can always follow up with the contact if something looks amiss or incomplete.

Reporting is in the Hotel Module.

Including QRcodes on Game Cards

You can score a game directly on the field after the game is completed by pointing your camera on your smartphone at a QR Code printed on the game card. Here’s how.

1) Generate your game cards as you normally would. When you select 3 up or 1 up, a checkbox will appear to the right of the drop down menu. Check that to create a QR Code specific to the game. As this is a bit of an data-intensive project, you should limit number of game cards made in a single batch. Filter by date and/or venue for the best results. Regardless, you should wait until all the QR Codes build on the game cards before attempting to print them or make PDFs of the game cards.
Making game cards with QR Codes for your soccer tournament

2) The Game Cards will print with the QR Code like below. They are designed to be used without needing a login password, so make sure you secure them as you would your game cards. (They will expire once used, however, and you can lock out all users from your admin)
Game card with QR Code

3) Use your smart phone’s camera or a QR Code app to read the QR Code. A score entry screen will display. Enter the score, verify it and update the game. (If either score is greater than 20, the HQ will need to enter the score.)
Score entry screen from a QR Code scan

4) You will only be able to score once using the QR Code. After you enter the score, the QR Code will be expired.

Also, if the HQ has already entered a score for the game, the QR Code will be expired. If you enter an incorrect score, you will not be able to make a correction from the field using the QR Code, so be sure to verify the score is correct.
Scoring screens for games already scored

5) If you feel the QR Codes have been compromised or you don’t wish for them to be used, you may turn them off globally from the Website Maint Module>Variables>GO! Locking scores entry will also lock the QR Codes, regardless of the lock state on QR Codes.
Locking QR Codes from the admin modules

Making custom game cards

The game card choices are designed to accommodate most tournaments. However, if you find your needs are radically different than what is offered, you will need to export the game schedule and create a mail merge document that is designed to work the way you want.

1. Export the game schedule by clicking on the XLS Export button in the Scheduling Module. You should leave the filters untouched to grab all the games.

export game schedule to XLS

2. Right click on the download link on the confirmation page to save the file to a location on your computer you can find easily.

3. Confirm the records are complete and sort them in the order you widh to import them into a mail merge program.

4.. Do a mail merge using something like Microsoft Office or a database program like Filemaker or Access. You should consult your User Manuals or Google on the software you are using for more detailed features.

Making labels for game cards

If you want to use Avery 1060 or 1064 labels, you will need to export the game schedule and do a mail merge using something like Microsoft Office or a database program like Filemaker or Access. You should consult your User Manuals for the software you are using for more detailed features.

How do I upload the current year logo?

1. In the Web Maintenance Module, Choose Upload the Shirt Design
The file MUST be a jpg file, no larger than 700px wide and less than 2meg. Make sure to simplify the file name to something like shirt.jpg to maximize your success.

2. Click on the Upload Shirt Design

3. When your file is uploaded, you should see the design on the page.

4. To use this to display in the Photo/Sponsor space on the front page, go to
Web Maintenance Module, Select Update the Website Variables

5. Find the Front Page Sponsor Ads, Photo Design and check the Display Graphic checkbox.

6. When you check the box, the design will override the ad or photo display.

7. To make sure you have a file to display, mouse over the words Display Graphic. You should see your shirt design in a pop up box.

8. This will also be the file that is used to display the shirt design for your pre-order form.

What advertising opportunities are available for my sponsors and advertisers?

Advertising on a TourneyCentral website take an integrated approach, i.e., we don’t just plop a banner on a page and hope your teams click on it. The Internet audience today doesn’t see banners anymore, much less click on them. To most users, they are in the way of the content. In addition, many advertisers do not have the skills to make web banners, so we simply do not support them.

We host advertising content your teams want to click on through from the DEALS banner at the upper right corner of every page, We also serve your advertisers’ ad as a text ad right below the main menu and the page content. Text gets indexed by search engines; graphics do not.

In addition to a listing in the DEALS, we enable you to serve a short offer directly on the page, with a tab click to a coupon or flyer and an embedded video. If the advertiser has a Twitter account and/or Facebook Fan Page, you can provide links to that as well directly on the advertiser’s listing.

For “sponsors only” (not DEALS) they appear on the Sponsors page available through the top menu.

And lastly, for a large sponsor you wishes to be on every page, we have reserved the upper left corner, right above the team and game drop down menus. (the size for this placement is 120×120 and there is only 1 inventory spot available per tournament website.)

Here is where everything is as your guest teams see it:

Front page:

Ad placements on the front page. Text ads and major sponsor ad appears on every page. If the advertiser has a website, the name is linked on the text ad.

DEALS Page (The DEALS “coupon” shows on every page)

Typical DEALS listing with Twitter, Facebook links. This listing has a flyer and video as well as a Superdeal (text in the box)


DEALS listing when the Flyer tab is clicked. Notice a link to a higher-res PDF is available.


DEALS listing when the video tab is clicked. The video should be hosted on YouTube or Vimeo, publicly viewable and embedable.

Sponsor page

The sponsor page is built from the advertising module, from the records marked Major Sponsor

Since there is no cost to the tournament for listing a sponsor on the page, you are encouraged to check the Sponsor checkbox for all your advertisers who run DEALS.

Additional Services
Many tournaments also integrate advertisers and sponsors into the emails that are sent out to the teams for registration, acceptance, schedules, etc. You may even wish to send out an email to the teams specifically for an offer from a large sponsor. You are free to do as much advertising via email as you wish for advertisers who are listed in the DEALS area. (You may not use the integrated team modules to blast out offers for sponsors/advertisers who do not advertise on your website.) You should exercise care when undertaking this kind of program as some teams may view it as spam, particularly when it is done too often.

You can also use your tournament twitter account to send out a tweet for sponsors, particularly on-site vendors right before lunch, etc.

Adding Google Analytics to your website

We already have Google Analytics (GA) installed on your tournament website to track aggregate data for TourneyCentral. The GA specifications are such that more than one GA code on a page is not officially supported by GA. There have been some hacks around this, we are aware of them and understand that they may work in some instances. However, they rely on very old code (2008 or so) and we prefer to keep current with any third-party tools

We have the Tournament PulsePoint which gives you some site specifics like traffic, unique visitors, etc. That is our official site tracking solution and we keep adding to it as the needs of tournaments change. if you would like to see something we don’t have, holler and we’ll consider adding.

If and when GA officially supports multiple GA codes on the same page, we will eagerly re-write our software to support this feature as GA gives you better planning tools for traffic analysis.

I have multiple tournaments. Can I get a discount?

We strive to provide the very best integrated software that saves the tournament time, provides for an exceptional user experience for their guest teams and offers the tournament opportunities to effectively service sponsorships and local advertising opportunities; all while remaining current with the expectations of website users and soccer trends.

From the onset, we decided that we would price the software and support fairly, that everyone would get the same price so there is never a perception of “back-room deals” and that we would provide ongoing support and upgrades for the tournaments. Our focus — as is yours with your tournament — is not to be the lowest price, but to be the BEST option in providing the ultimate guest team experience. In turn, that experience would attract more teams to the tournaments as they begin to recognize the TourneyCentral format as being the partner provider with only the best tournaments that share our values of excellence.

For us, discounts mean three things:

1) An acknowledgment that we have been overcharging you all along and
2) Less margin to adapt, grow and evolve as the tournament landscape changes rapidly.
3) Increased administrative costs in keeping all the “special deals” straight.

None of these things serve either of us well.

Nonetheless, we realize that certain tournaments may be more price-sensitive than others and we encourage you to always be searching for the best value that serves your tournament. We expect no less from the best. While we will never compete on price, we do listen and implement ideas that come from tournaments that enable them to attract the best teams into their tournaments. We are here to support you when you need help and are nimble enough to implement changes that keep the tournaments we support on the cutting edge of both technology and the soccer industry. For example, we have recently integrated social media networks like Twitter, Facebook and YouTube into our team, scoring and advertising modules, with more features to come. Our PulsePoint Dashboard provides information about your tournament that supports it as a positive community event. The list beyond the basics of application, scheduling and scoring goes deep and broad.

That being said, we are always looking for ways to cut the cost of providing the service while maintaing the high standards of accessibility that define the TourneyCentral brand. We would be the first to pass that savings along to all of our loyal tournaments.

I know that is a very long answer to a really short question, but somehow “No” just didn’t seem to be right answer to give back. I hope my more detailed explanation explains our vision of the soccer tournament landscape and that the vision aligns with yours for your tournament and that we will enjoy a very long, very prosperous partnership.

How PayPal looks on your site

When you have activated PayPal, the Buy Now button it will appear on your site in two different places:

1. After the team has completed the application and
2. When they log in.

After you have marked their application PAID, the PayPal button will no longer appear.

The button looks the same in both places, but the screen shots below are what the user sees after logging into the team application.

A click on the Buy Now button will bring the payee to the next screen. If they have a PayPal account, they can log in and pay with that OR if they just want to pay with a credit card, they click on the Continue link highlighted in yellow. (our highlighting, not PayPal’s)

Changing Tournament Directors/SuperUsers

You changed tournament directors. You will need to change the SuperUser and your new director may need to be onboarded.

To change SuperUsers, simply contact TourneyCentral and we will do that for you OR your current SuperUser can change the name, email, password and PIN to the new SuperUser. In the event you wish TourneyCentral to do this for you, we will need an email cc:ed to all parties and the new SuperUser accepting the new role.

During the first year of a tournament, we provide extensive, unlimited training and assume there is a transition plan in place. In the event there is no transition plan (it happens!) and your new director needs training from the ground up, we charge $50/hour for the additional training.

In the SaaS agreement:
Software Training and Support
RSI will provide unlimited training for the SuperUser during the initial season of this agreement. In addition, an extensive library of product and process knowledge is published in the Help module, available to every person with a log-in ID. This library is updated regularly by RSI. EVENT understands that it is responsible for a reasonable amount of product knowledge retention and transfer to its staff for subsequent years. While RSI will support the software, RSI may charge an hourly rate of $50.00 to EVENT for re-training and/or training for event seasons beyond the initial season. Support shall be primarily via email.

TourneyCentral has agreements with qualified event management for the additional on-boarding.

How do I change the header graphic?

We recommend that you NOT change out the logo from year to year and instead, develop and feature a logo and name that persists so teams can find you and identify with your branding.

If, however, you wish to change the header graphic, these services are available for the current rate of $95.00/hour, minimum one hour.

In order to maintain consistency and a high quality appearance across all the TourneyCentral events, all graphic work to the site is performed by TourneyCentral. While your designer is welcome to provide feedback, the final decision on the artwork belongs to TourneyCentral.

*The initial set up, including the header artwork is free.

How do I make changes to the graphic header on the site

The graphic header on the Web site was established when your tournament site was first set up. It contains your tournament logo, name and the web site address. This was part of the complimentary Web site set up done done initially.

Because it also serves to help identify the TourneyCentral brand, we reserve the function of creating it and making all changes. We will pass the header by the tournament director for approval, but the overall quality and integrity of the design must meet our standards of quality, usability and element placement.

The graphic header, along with the set up of your tournament site including your domain, is done as a one-time set up free of charge. While all other software updates and upgrades are always free, graphic changes are not. We urge you to consider the headers with the long-term viability of your tournament in mind or budget for annual changes.

Clickable Logos:
We do not allow clickable logo in the header, partly for design reasons, party for technical reasons and partly to establish value within the sidebar and DEALS areas for you.

Yearly Logo Changes:
We STRONGLY recommend that the logo you choose for your header graphic communicates the tournament as one that is stable year to year. While you may have a new shirt design or event logo each year, the logo you choose for your Web site should be one that is static from year to year.

However, we recognize that some events have strong feeling about changing out the logo every year and we allow for that. In your User Agreement, there is an hourly charge for graphic changes, minimum one hour per approval cycle. Our preferred format — and one that will save you hours of design charges — is as an Adobe Illustrator vector file, with layers in tact. The next preferred is an Adobe Photoshop file with layers. We can work with jpg files, but they should be large and have a minimum of drop shadows and small type. The more time we spend stripping away a background, the more expensive it will be.

Yearly Logo Change Options:
The free options available to you to display your yearly logo on your site are:
– Include the logo as a Major Sponsor in the Advertising Area so that it rotates in the sponsor area on the front page.
– Include it as a photo and turn on your featured space as Photos instead of Ads
– Set the design to permanently display in the feature space by checking “Display Graphic”
Be sure to upload your shirt design first. All of this is done in the Web Site Maintenance Module.

Requesting a change to the core software

We get suggestions all day long, every day and putting them all in practice would erode the benefits of providing standardized software and would increase support and development costs far out of reach of most soccer tournaments.

In order to provide the featured web site at the prices we do, we MUST be able to standardize on certain things, they MUST work with all our tournament events and for those items that are variable, we MUST make it so the user can set the options themselves reliably. That being said, the apps, schedule layouts, forms, feedback, application/acceptances/payment/confirmation flows etc are those such things.

That is the short “No”

We frequently take user suggestions and incorporate them into the system, so the long “no” is:

No, not yet, but…

– Why?
– What benefit would this have for the tournaments and teams?
– Would it create confusion or the potential of confusion?
– How would this increase team applications and/or decrease the number of clicks to a particular task?
– Does this add value to the process or is it just personal preference?
– Is personal preference enough to add value to the product?

Sell us on why this would benefit ALL of our tournament events and we’ll consider it for the next round of updates.

Also, send us what you propose. The more detailed, the better.

Upload a logo into the Hotel Listing

1. Build the hotel listing Edit/List Existing Hotels>Go!

2. Click on the hotel icon to bring up the logo upload window

3. Find the logo file and upload. Refresh the window.

The logo MUST by a jpg file in RGB mode. Make sure there are no “funny” characters in the file name, including spaces, dashes, underscores, etc. It is best to resize the file to 100px wide BEFORE attempting to upload it.

The following video will guide you through the steps above.

Remove a Sponsor from the listing

1. In the Advertising/Vendor Module, select Edit/List Company from the drop down menu.
removeSpon01
2. Check the Major Sponsor check box.
removeSpon02
3. Click Go!

4. Click on the link on the company name
removeSpon03

5. Uncheck the Major Sponsor checkbox.
removeSpon04
6. Update the record.

The sponsor will be removed from the ad rotation on the front page and the text links as well as the sponsor page.

Rolling forward to the next year

Congratulations and welcome back to TourneyCentral for another year! This help document assumes you have already been through at least one season of using TourneyCentral and you are now rolling your tournament forward.

Step 1: Contact us when you wish to roll forward. Mostly likely, we have locked out the admin area to avoid premature resetting of critical data items like taking applications for the previous year, etc. Once we have reset your current years, you are then ready to go. If you need a team list and schedule from the previous year, ask for this BEFORE we roll you forward as extracting it after we do will require a charge of $100.00. (You grabbed this right after your tournament ended last year, right? 🙂 )

Step 2: We have now rolled forward your CURRENT YEAR and the DOB YEAR that calculates the dates each age group fits into. Your planner items have all been cleared and their dates have been rolled forward exactly one year. Your current teams have been dropped into the MARKETING MODULE.

The GAME SCHEDULE and ACCEPTED TEAMS have NOT been cleared from the side menus for a very specific reason. They are your best marketing for your upcoming tournament. Coaches want to see who participated in the tournament last year, how you seeded them, what your schedule was like and how the teams ended up. You are free to clear the teams by pressing the Clear Team Menu in the Applications Module and Unpublish the Schedule in the Scheduling Module. Once you do this, though, you can’t go back, so make sure you really, really, really want to do this.

Step 3: We will contact you to update the authorized contacts, verify invoicing and mailing addresses.

Step 4: You should update the following items as soon as possible to avoid confusing your guest teams:
Team Applications Module
– Application fees (gender, age, format)
– Competition levels (upper, lower, etc)
Web Maintenance Module
– Front page news items
– About Page
– Rules Page
– Web site variables to include dates, location, the fees description. Be sure to check/uncheck whether you want applying teams/clubs to appear on your site. As you will have none to begin with, you may want to hide this until a significant number of teams apply.
– Maps and Venues. If your field layouts may change, it is best to delete the field maps from each venue
– Update/Add FAQs
– Update your forms. Delete those that are specific to the previous year and roll the year forward for those that you can re-use. Upload your sanctioning/permission to host form. Make sure you check to make this visible in the variables.

Hotel Module
– Update hotels. If you marked them Sold Out, make sure they reflect an Available Rooms status

Scheduling Module
– Double check standings to make sure they are consistent with the rules. NOW is the time to make sure you don’t write rules the software can’t support (even though we find it hard to believe we didn’t think of every combination of tie-breaker…) If you write rules the software can’t calculate, you may want to revisit the rules.

Referee Module
– Unpublish the game schedule if it is still active to prevent referees from logging in.
– Add the dates and the appropriate AM/PM per day so the referee can indicate availability easily.

Admin Users Module
– Verify everyone who needs access to the site is active and they know their password. IF YOU ARE NOT THE SUPERUSER, PLEASE DO NOT ASK TOURNEYCENTRAL FOR YOUR PASSWORD. You must get that from your SuperUser. At some point, we will limit the number of admin users to under 5, so please give out access thoughtfully.

That is about it. We recommend you do all of the above things in one fell-swoop to avoid parts of your site from not being updated as things get busy. Later almost never comes.

Tournament logo and header changes

Soccer Tournament Phases Planning Matrix

The goal is to be up-to-date, TO THE DAY (to the hour during the tournament event) at all times. The “trick” to staying up-to-date is to prepare as much of the
information, including broadcasts, forms and FAQs in advance and stage them.

This reduces the level of anxiety for your guest teams, increases their trust in
the accuracy of your web site and reduces stress considerably for you, allowing you to spend more time in seeding and scheduling your guest teams more
accurately and efficiently. The matrix below is merely an outline for events that happen through the seven phases of a tournament.

Download the matrix PDF

Tournament PulsePoint™

Each TourneyCentral tournament site comes with built in trending and tracking tools that calculates economic impact, web site traffic, geographic reach and real-time mapping of guest teams.

For your sponsors and advertisers, you can track unique users, age views and demographic data that indicates affluence such as average home value and income.

Instead of automatically refreshing, the PulsePoint Data will now only be rebuilt manually by the SuperUser. This will allow a faster login procedure, especially for scorekeepers at the fields. When the PulsePoint data is older than four hours, the login screen will reflect that and the SuperUser will be given an opportunity to rebuild the data files from the Admin Messages Module, only visible to the SuperUser.

The PulsePoint™ is available to the SuperUser from a tab at the top level log-in screen.

Soccer Tournament PulsePoint™

Soccer Tournament PulsePoint™

How do I change the front page to display my current year design

Step One: Upload your design

1. Select ‘Upload the shirt design’ from the action menu in the Web site maintenance module.

2. Click on the ‘Upload the Shirt Design,’ navigate to your prepared graphic file (.jpg only, not larger than 300k, sized to 600px at 72dpi, RGB… NOT CMYK)

3. Click on ‘Upload’

4. Refresh and close the upload window. Make sure your design shows on the page.

Step Two; Turn on the design to the front page.

The design will override the photos or sponsor ads. Make sure you have not sold front page display ads to any sponsors or they won’t see them, even if they are in the Advertising Module.

1. Select ‘Edit web site variables’ from the action menu in the Web site maintenance module.

2. Scroll to the option ‘Front Page Sponsor Ads, Photo Design’ Roll over the words ‘Display Graphic’ If your shirt design has been properly installed above, you will see it pop up in a window.

3. Check the box next to ‘Display Graphic’

4. Click on ‘Save Changes’

5. Verify your design is now on the front page by clicking on the ‘Home’ icon in the Main Menu. Refresh if needed.

Screen Shot 2016-03-13 at 8.25.02 AM

Setting up PayPal

If you choose to set up credit cards on your site, we support the PayPal API standard on our Premier and Elite packages.

1. Set up an account with PayPal. Make sure that your bank accounts are all connected. We can’t help specifically with this, but the folks at PayPal will be happy to answer any questions you may have.
PayPal account
2. Once you have a PayPal account, you should enter that email address in your Web Maint Module>Variables>Go! and update them. (Box 1) Then, check whether you want to take credit cards for applications, other items on the site such as apparel or both. Update the page again.

3. Then drop an email to helpdesk@tourneycentral.com We will verify that the email address OR the Business PayPal Account (recommended) is working and the PayPal connecion is made before we turn on the credit card option.

“Convenience Fees”
Many states have laws that prohibit the addition of “service fees” for credit card use, setting minimum purchase amounts or giving discounts for cash. Since TourneyCentral services tournaments nationwide, we avoid writing support for fees like this in our software. There are exceptions, but you should check with your own legal team to make sure you are operating within the your state and local laws.

We are aware a lot of merchants do it and a lot of consumers pay the additional fee without knowledge of prevailing laws. That is not a conversation we wish to engage. However, if you feel strongly about “convenience fees,” we do have a custom credit card option at the Elite level, where we will integrate your chosen processor at which time you can set handling fees, etc. as you see fit.

Barring the selection of the Elite level for your tournament, you should look at setting the team fees to offset the expense of taking credit cards, as other businesses do, as a cost of sales. For planning purposes, on average, tournaments we see that give teams a choice to pay by credit card run about 10-12% of their volume, usually near or after the application deadline.

For tournaments that offer credit cards for apparel purchases pre-sale, we don’t see additional lift. But, for events that offer credit card at the point of sale, we hear anecdotal evidence at about 40% lift.

Teams step-by-step to Paypal

This is the current PayPal step-by-step for teams who are unfamiliar with PayPal.

1. Log in using your TeamID from the front page.

2. If your team has not yet paid for the tournament, you will see a PayPal payment button. (This may look slightly different due to button upgrades, etc, but it functions the same)
ccframe0

3. Click on the button to go to the PayPal screen
ccframe1

4. PayPal wants you to use your PayPal account primarily, but if you want to use a credit card, look over to the right, and down for this. Click on it.
ccframe2
You may need to create a PayPal Account, but if you never link your bank info, it will only be used for confirmation emails, etc.

5. You will then be able to pay with a credit card.
ccframe3

You may get several confirmations, depending on your credit card policies. The tournament will then mark your application paid once it confirms your payment has been received and the Pay Now button on your team profile will be removed.

Using Invoices (Square, Stripe, Quickbooks, PayPal) for credit card payments

PayPal is our officially supported integrated processor. We recommend you set up and use a BUSINESS PayPal account should you wish to accept credit card payments for all teams.

We recognize that you may wish to use other processors that support credit card and ACH payments from other processors such as Stripe, Square, Quickbooks, etc and we have a supported method to do that.

  1. You should first set up an account at these services, link them to your bank, verify your account and sign up to use invoices. Due to the differences in these services, we can’t provide direction here to set up you account, so you should consult with the online manuals for their procedures. (a Square example follows at the bottom of this page)
  2. Decide whether you wish to provide access to invoices for all teams or just have the option on a per-team request. If you want to accept invoices for all teams and you want the credit card icons to display on the front page, about, application pages, contact TourneyCentral first to set this up in your global config. If you want to provide credit card payment on request only, you should leave the PayPal merchant number field BLANK in your WebMaintModule>Variables>GO! screen so the icons do not display.

You can still set up using PayPal AND invoices, but when you enter an invoice link, it will override the buttons to PayPal. You may find this useful when a club wants to pay for all their teams with one transaction.

Set up an invoice for a team to pay

  1. A team must first apply to the tournament.
  2. Log in and get the team information — team name, loginID, email of the primary and the amount owed.
  3. Create the invoice in your processor dashboard.
  4. At this point, you may choose to simply send via email, copy/past the link or both. In any case, you should copy the invoice link and past it into the team record at the top of the team detail screen. Be sure to click on the “Modify Application” to save the link to the team record.
  5. When the team logs in with their TeamID, the credit card pay button will be replaced by the Pay Invoice link if you have activated PayPal for all teams OR the link will be available just for that single team if you are only providing credit card payments on request.
  6. When you receive the credit card payment, you should mark the team PAID as you normally would and the link will disappear.

What this looks like on the admin end

When you have added an invoice link to a team, a clickable icon will appear in the team listing near the fees. Once it is marked paid, the link will drop away.

You can also see all the invoices in a minimal listing by filtering on Fees>Pending and click on the Invoices button in the Team Applications Module. The clickable icon will display.

Sample for creating a Square Invoice

This is a set of screenshots at Square, current as of Jan 21, 2021. They may have changed the screens slightly since, but the procedures should be similar. Please consult the online manuals for other services. (This assumes you have activated invoices for your account.)

Log into your Square account and, navigate to the Send an Invoice button.

Copy/paste the team name and loginID (so you can track payment back easily) into the field. Select to make a new customer.

Complete the customer set up for as much information you you want. Only the name, email address is necessary.

Select to send either manually or email. If you elect to send via email, Square will send it out automatically and the team can pay directly from the email. We recommend even if you send via email, you also copy/past the link into the team file so you can easily see which team received an invoice. This will also help you manage the team should your Square invoice go to their spam folder.

Enter in the Tournament Fees qty and amount. You will also need to customize to remove the tax if you have not set this product up in your product catalog. If you have, you may need to adjust the fees amount if you have not set up multiple fees levels.

Click to make the invoice at the top right and copy the link to enter it into the team record.

The invoice will look like the screen shot below, though yours may appear differently depending on the options you selected in your Square Account when you set up invoices.

Team App Hed

Setting up your TeamApp to work with TourneyCentral

We do not have a dedicated app, but that doesn’t mean you can’t have an app for your soccer tournament event. Our endorsed solution for a soccer tournament app is to use TeamApp. As with everything TourneyCentral, if you would like us to set up your app, just call or email us and we’d be happy to do it. Once the app is set up, you take ownership of it and become the admin. (we will send you an email and you should take ownership within 10 days. If not, we’ll assume you changed your mind and will delete your tournament from the app.)

Read this for our position on apps for tournaments.

To set up your tournament to work with TeamApp:

  • Make sure you have a tournament logo in a SQUARE format, with a transparent background. PNG format works best. Just make sure it is clean and sharp. A logo that is at least 300x300px will work best.
  • Set up an account with TeamApp
  • When you have verified your email, etc. go to the MyTeams option and create a team app
  • Follow the screen shots below and activate only the buttons that are shown. The format for the Scores and Deals are http://xxxxx.tourneycentral.com/m/?deals=1 and http://xxxxx.tourneycentral.com/m/?divscores=1 where the xxxxx is replaced by your TourneyCentral account you can find in your original set up document or by clicking on the mobile icon in your left rail.

Step One Team App

Step two TeamApp

Step Three Team App

Step Four TeamApp

DEALS TeamApp

Scores TeamApp

  • Caveat: You CAN activate the built-in scores, standings, schedules buttons on the TeamApp, but you will have to enter all the data twice, including all updates and scores; once in your website and again in the app. When you link to the scores, deals you only need enter them in your admin area and the app will display them in the app.
  • All other features in this app, we’ve found are simply not used by the teams. They appear to be really cool, but you are just asking for more work that users will not appreciate. All of the photos, social media sharing, etc are done in their own private facebook, instagram, twitter and snapchat accounts, shared within their own micro-networks. (There is more about this in our book, The Game Through Glass)

Next steps
Once you have your TemApp all set up, as an admin, you will need to decide how you want your tournament teams to sign up to receive notifications, etc. Keep in mind, all this information is already available through a browser on their phones. The only real features they will be gaining is: 1) Keeping all their tournaments in one place and 2) Notifications.

The default group is Players and Officials. You can set up more if you’d like, but we find it starts to become burdensome administration.

Download the app to your smartphone, iOS or Android.

Search for your event and add yourself. As an admin, you can send out notifications from your phone, approve folks who sign up (or set to automatically accept them without approval… you decide how you want to handle this.) You can even add users in bulk, though they will not get the notifications if they do not have to app on their phone.

Sending out notifications and keeping in synch with your website news
Unfortunately, there is no “enter once, display everywhere” feature for notifications and news. (We’re working on it, though!) Also, assume that most teams will not download an app until they figure out that if they download the TeamApp, they can keep track of multiple events in one place. At that point, they will find it wicked cool and easy to just add and turn off/on events they go to.

So, given that, we recommend that for news you update your front page news in the Website Maintenance Module FIRST, then copy/paste the news into the Notifications/News feature of the app and send it out.

Be sure to also update your other social channels, such as Facebook and Twitter as the teams may be following you there for news. Update everywhere for critical information such as lightning warnings.

Promote the app on your front page
A few years ago, teams were eager to download an event app. Now, not so much as it is an additional step, some won’t have space on their phone… a whole host of reasons. If you want to use an app, you will need to market it aggressively. See this event for an example. If you would like to feature the app on your Suggested Mobile Apps Page (the link below the mobile icons in your left rail) we can install one for you.

You can explore additional features of TeamApp (there are many) but this tutorial will get you up and running with the basics, integrated with your TourneyCentral Scoring/Standings module.

Years Definitions

DOB Year
This is the basis for the division age calculation. Typically, it is set for August 1. You are not able to change this from the admin screen. Rivershark will set this when renewing your agreement for a new year.

Schedule Year
The schedule year is the year for which you wish to display the schedule and accepted teams. This will be last year’s schedule UNTIL your application deadline for the current year. You are not able to change this setting from the admin screen. Rivershark will change this once your deadline has been reached.

Current Year
The current year is the year for which you are accepting applications. You are not able to change this setting from the admin screen. Please contact Rivershark for help with this.

What is the Accept/Confirm Process?

It is important that you do these tasks IN THE ORDER presented. If you do things out of order, you will get email and phone calls saying that the web site is “broken”. There are many teams and only one of you, so the ratio is upside down. However, if you do everything below IN ORDER and COMPLETELY, things will go SOOOOO smooth and save you a TON of work.

APPLICATION PROCESS CLOSED
– When the deadline has passed, teams may still submit applications, but they will be flagged as Waiting, in green, on your team applications listing.
– The register.html page will also say that the application process is CLOSED, but invite them to apply and that they will be contacted by the tournament if there is an opening.
– The tournament director should change the front page message to reflect the registration status. Also, the quick news should be changed as well as the crawler. The quick news is a great place to highlight any divisions that need more teams, example: We are looking for 3 more Boys 10 teams to round out our division. Click on REGISTER above to apply.
– When the deadline is past, the teams WILL NOT be able to modify ANY part of their application themselves. However, they will be able to see the STATUS of their fees, acceptance, etc.

FORMS, ACCEPTANCE, CONFIRMATION
WEB MAINTENANCE MODULE
– By the deadline, you should have updated ALL the forms necessary for registration. IT IS IMPORTANT THAT THESE LINKS ARE AVAILABLE AND ACTIVE BEFORE YOU ACCEPT TEAMS. Things happen VERY fast on the Internet.
– WRITE the acceptance and rejection email. (samples in the Help Module… PLEASE customize it to the Tournament Development Event Invitational) Stage this and be ready to send.

DO NOT ASSUME ANYTHING!! Write a Step-by-step process, going through the confirmation process yourself to make sure anyone can confirm following your directions.
TEAM APPLICATIONS MODULE
– Click on Go!, select Accept from the drop down menu, check the teams to accept and click on Mark Checked Applications.
– Then do the same for the Unaccepted teams, except select Not Accept.
– IMPORTANT Click on the Build Team Menus button. This makes the drop down menus along the left side of the web site. (You should “refresh” the menus each time you accept or drop a team, just to make sure the latest team list will be built.)
– Now filter on ACCEPTED teams and click Go! Select All. Type in a Subject and paste your ACCEPTED message into the message field.
– Send.
– Then do the same for the Rejected teams, except filter on Not Accepted and paste the Rejected message into the box.
– Double, triple, quadruple check that the team is marked accepted and non accepted BEFORE clicking on that Send button. Computer make very fast, very accurate mistakes… there is not recovery from sending the wrong message, so slow down, unplug the phone, shut the door and just really make REALLY SURE you are sending the right message to the right group.
– Change your front page message saying that all accepted teams have been notified via email.

CONFIRMATION
– Almost before you are done sending the message, teams will confirm. It is explained in the email message, but basically they need to log in using their TEAM ID NUMBER (we put it on EVERY email sent through the broadcast tool), click on the Confirm Attendance button and download all the forms you updated in the Web Maintenacne Module. After a team confirms, the confirm button will change to Duplicate Forms button. This is so they can go back and download the files again if needed.

SCHEDULING
TEAM APPLICATIONS MODULE
– Seed your teams (see tips in the newsletter)

SCHEDULING MODULE
– Set up/edit your maps
– Set up your fields
– Set up game dates and times.
– Set up your divisions.
– Set up your winner placeholders (Winner A vs Winner B in BU10). There is a one button “Make Placeholder Teams” that will build Winner A, Winner B for each division, so make sure ALL the divisions you are using have been entered and are named correctly before you build winner placeholders.
– Start scheduling.. Only ACCEPTED TEAMS will appear on the drop downs, sorted by Division and Bracket
– Publish schedule when done.
– If you add or change ANY game, be sure to re-publish.

Send emails… make sure you check ONLY accepted teams….

Sample Not Accept Email

——————————————-
RIVERSHARK CYA DISCLAIMER
——————————————-
The following snippet of text is merely a ‘serving suggestion’ for you to edit to fit your event. You are STRONGLY urged to read and re-read the copy and edit as necessary. PLEASE DO NOT MERELY CUT AND PASTE AND SEND OUT IN A BROADCAST.

Use at your own risk; provided AS IS. You should ALWAYS assume that you will find something that is inaccurate or just plain wrong in the following copy. Don’t blame us if you fail to read and/or edit for mistakes, typos, test the links or anything else contained herein.
——————————————–

We regret to inform you we were NOT ABLE TO ACCEPT your team for the Tournament Development Event Invitational. We received applications from many more teams than could be accommodated by the limited number of fields and referees.

In reviewing all applications, participants were selected using the following criteria:

– Geographical mixture;
– Level of league play;
– Tournament participation, and
– Competitive team history.

Please understand that our inability to accept your team into this year’s tournament is by no means a slight against your team. We simply could not accept all the teams that showed interest and had to use the above criteria to sort through all the applications.

Let the teams know how and when they will get their money back.
We are returning your original check for your tournament application fee.

We hope to continue to increase the number of teams in next year’s tournament and hope you re-apply when registration forms are available on our web site after DATE. In the meantime, we wish your team the best of luck during the upcoming season and thank you for considering the Tournament Development Event Invitational.

The Selection Committee

Sample Broadcasts Snippets

——————————————-
RIVERSHARK CYA DISCLAIMER
——————————————-
The following snippets of text are merely ‘serving suggestions’ for you to edit to fit your event. You are STRONGLY urged to read and re-read the copy and edit as necessary. PLEASE DO NOT MERELY CUT AND PASTE AND SEND OUT IN A BROADCAST.

Use at your own risk; provided AS IS. You should ALWAYS assume that you will find something that is inaccurate or just plain wrong in the following copy. Don’t blame us if you fail to read and/or edit for mistakes, typos, test the links or anything else contained herein.

These snippets are designed to be cut and pasted to make complete broadcasts, depanding on the topic. You should send them out as they are appropriate for your event.
——————————————–

Place at the top of each broadcast. Keep it rolling by removing deadlines that have already passed. COACHES RESPOND TO THINGS THAT SAY DEADLINE!
DEADLINES:
Monday, XX/XX/XXXX: T-shirt and pin Pre-orders
Saturday, XX/XX/XXXX: Something
Thursday, XX/XX/XXXX: Something else

TWITTER
Now you can get scores update notices on Twitter. Just follow @tourneycentral (http://twitter.com/tourneycentral) (or search for #EVENT.) Each time the scores are updated, we will send a tweet out with the division(s) that are updated along with a link to the tournament site. Using Twitter is best from a Web-enabled smart phone such as iPhone or Blackberry, but you can configure your Twitter account to send you text messages when we update.

You can also use Twitter to post up a spirit message. Just send the tweet to @tourneycentral and be sure to use the tag #EVENT If the player or fan is also on Twitter, be sure to include their Twitter account as well so it shows up in their stream.

Wondering how to use Twitter? Check out this video (http://www.youtube.com/watch?v=ddO9idmax0o). If you don’t have an account, the soccer tournament is a perfect excuse to get on Twitter. It’s free!

CHANGES TO YOUR APPLICATION
Please take a moment to verify that all the information on your application is correct. Using your TEAM ID NUMBER posted above, please visit the web address below to make edits to your application, if needed. Any changes to application can be made online until XX/XX/XXXX
http://www.thegameofsoccer.com

COLLEGE COACHES
Again this year, we will invite college coaches to attend the Tournament Development Event Invitational. Last year, we had 38 college coaches attend to watch players. Your players will be given an opportunity to complete a profile and have this available for the coaches who attend. As the event draws nearer, we will have more information about the college profiles.

COLLEGE COACHES PROFILES
U14 and older only, please!
COACHES: Please log into your team application page and enter your TEAM LIST, including player names, position and jersey number. Once you enter this information for your team, you can use the Team List to send an email with a password to each player. Each player can then complete their detailed profile so college coaches can search the profiles.

HOTELS
Have you reserved your hotel rooms yet? Some hotels are already full and many are receiving requests daily for rooms. Don’t get caught up in the mad scramble to book a room at the last minute. Visit the hotel area on our web site today to request rooms.
http://www.thegameofsoccer.com/tavel.html

RESTAURANTS AND TOURNAMENT DEALS
We are beginning to post up restaurant and tournament deals as receive them from our sponsors. Many of these are good discounts for meals and entertainment. We encourage you and your parents to check the web site often and search the travel database.
http://www.thegameofsoccer.com/cgi-bin/seq.cgi?fnc=coupon&anchor=A

TOURNAMENT DEALS
Tournament deals are available from local businesses. Please visit the deals page and encourage your team and parents to support the businesses who help make the Tournament Development Event Invitational possible. You can also visit the Tournament Deals by clicking on the red coupon along the left side of any page on the web site.
http://www.thegameofsoccer.com/cgi-bin/seq.cgi?fnc=coupon&anchor=A

TOURNAMENT DEALS
Have you made your lunch and dinner plans while you will be at the tournament yet? Why not “stroll” on over to our Tournament Deals button on the left side of every page to check out what local restaurants are featuring. We’re adding new deals all the time!
http://www.thegameofsoccer.com/cgi-bin/seq.cgi?fnc=coupon&anchor=A

COUPONS AND SPECIAL DEALS
Be sure to check out the travel section by clicking on the Tournament Deals! Button in the left rail on any page of the web site.
http://www.thegameofsoccer.com/cgi-bin/seq.cgi?fnc=coupon&anchor=A

T-SHIRTS AND PINS
Has your team ordered t-shirts yet? Get a great pre-tournament price on orders placed now. Last year, we ran out of pins due to a heavy amount of pre-orders. We ordered more this year, but don’t run the risk of not getting your pin because of a late order. See the design and download the order form on the web site.
http://www.thegameofsoccer.com/shirt.html

SCHEDULES
The schedules are expected on or about xx/xx/xxxx. Please do not email asking when they will be available. When the schedules are available on the web site, we will send an email to the primary and alternate email address(es) used when you applied. It is very important that you notify us of an email change by using the form at http://www.thegameofsoccer.com/contact.html (Please DO NOT EMAIL as this may cause a delay in making the change.) As with the acceptance packets, we will NOT be mailing (USPS) the schedules. If there is a change to a schedule, you will be sent an email notifying you of this. Updating the web site is the fastest, most efficient way for us to communicate a change, so please double check your schedule on the web site.

SCHEUDLES
The schedules are now available on line. Please check your schedule by selecting your division in the drop down menu in the upper left corner of any web page, under the GAME SCHEDULES
http://www.thegameofsoccer.com/games.html

REGISTRATION
Check and double check that you have all the form necessary for registration. If a player is missing a form, they will not be allowed to play. *All guest players outside STATE MUST BE VALIDATED by their STATE ASSOCIATION. There will be no exceptions to this rule.*

Your registration requirements may vary, but the important thing is to MAKE A LIST. The list below is a SAMPLE ONLY.
REGISTRATION
Check and double check that you have all the form necessary for registration. If a player is missing a form, they will not be allowed to play. *All guest players outside STATE MUST BE VALIDATED by their STATE ASSOCIATION. There will be no exceptions to this rule.*

What you need for team registration…

If registering under USYS, you will need to provide�the following:
1. Original State Approved Roster and one copy of that roster to leave with the tournament
2. Validated Player Pass Cards..both rostered players and guest players
3. Validated Coaches Pass Card..one for each coach, if applicable. Maximum of 3
4. Medical Release Forms..one for each player. You may use your teams own forms.
5. Tournament Liability Form which must be signed by all players and a parent or guardian
6. Travel Permit if outside of STATE
7. Guest Player Roster approved and validated by the state in which the player is registered

US Club Soccer Requirements
If registering under US Club Soccer affiliation, you will need to provide the following:
1. Approved Official Roster
2. Medical Release Form for each player. You may use your own team form if you already have one.
3. Validated Player Pass for each player
4. Validated Coaches Pass for each coach..maximum of 3 coaches
5. Tournament Liability Release Form signed by all players and a parent or guardian

*Players over the age of 18 may sign their own forms

Sample Accept Email

——————————————-
RIVERSHARK CYA DISCLAIMER
——————————————-
The following snippet of text is merely a ‘serving suggestion’ for you to edit to fit your event. You are STRONGLY urged to read and re-read the copy and edit as necessary. PLEASE DO NOT MERELY CUT AND PASTE AND SEND OUT IN A BROADCAST.

Use at your own risk; provided AS IS. You should ALWAYS assume that you will find something that is inaccurate or just plain wrong in the following copy. Don’t blame us if you fail to read and/or edit for mistakes, typos, test the links or anything else contained herein.
——————————————–

Please read this entire document first before clicking on any of the links. (If the links do not appear in your email, you should copy/paste the web addresses into your browser.) You may wish to print this email. It will save you time and frustration in the next few weeks.

TEAM ACCEPTANCE:
We are pleased to ACCEPT YOUR TEAM LISTED ABOVE as a participant in the Tournament Development Event Invitational.

ACCEPTANCE PACKAGE:
We are distributing the acceptance materials via our web site. IMPORTANT: THIS WILL BE THE ONLY METHOD OF ANNOUNCING AND CONFIRMING THAT YOU HAVE BEEN ACCEPTED. You must confirm first to receive the materials. Please read the procedure below:

CONFIRM ACCEPTANCE:
by following these steps:
1. Go to the web address: HOME PAGE
2. Enter your TEAM ID NUMBER at http://www.thegameofsoccer.com/login.html
3. Click on the LOG IN button
4. You will be sent to a page with your team information.
5. Click on the link that says “Confirm Attendence”
6. You will then be sent to a page that lists all the forms you will need for registration

***READ, PLEASE***
To get DUPLICATE forms at some date in the future, simply log in again using your TEAM ID NUMBER. The link will then say “Click here to get duplicate forms” When all the teams have confirmed, we will post a quick button on the front page that leads to the duplicate forms.

TOURNAMENT DEALS
Tournament deals are available from local businesses. Please visit the deals page and encourage your team and parents to support the businesses who help make the Tournament Development Event Invitational possible. You can also visit the Tournament Deals by clicking on the red coupon at the top of any page on the web site.
http://www.thegameofsoccer.com/cgi-bin/deals.pl

PHOTOS
Make your photos part of the game action! Write up your photo program, if any.

TWITTER
Now you can get scores update notices on Twitter. Just follow @tourneycentral (http://twitter.com/tourneycentral) (or search for #EVENT.) Each time the scores are updated, we will send a tweet out with the division(s) that are updated along with a link to the tournament site. Using Twitter is best from a Web-enabled smart phone such as iPhone or Blackberry, but you can configure your Twitter account to send you text messages when we update.

Wondering how to use Twitter? Check out this video (http://www.youtube.com/watch?v=ddO9idmax0o). If you don’t have an account, the soccer tournament is a perfect excuse to get on Twitter. It’s free!

ANNOUNCEMENTS
ALL SIGNIFICANT ANNOUNCEMENTS REGARDING THE Tournament Development Event Invitational WILL BE SENT TO THE PRIMARY EMAIL ADDRESS YOU SUPPLIED ON YOUR APPLICATION. All changes will be posted to the Web site as they occur, so please check often.

SCHEDULES
Schedules will be posted soon. When they are available, you will be sent an email AND they will be available from the drop down menu at the upper left corner of any page on the web site.

SCORES
Scores will be posted on the web site during the event. We strive to post the scores in real time so families who are in other parts of the country, the world or must remain home can still watch the action.
http://www.thegameofsoccer.com/games.html

Good luck and welcome to the Tournament Development Event Invitational.

Rules Template

Use this rules template as an EXAMPLE ONLY! Please review them carefully before using.

——————-

Rules for the Tournament

Tournament Headquarters
FILL IN MAIN ADDRESS

Tournament Director: FILL IN TOURNAMENT DIRECTOR

Registration and Team Eligibility
Registration Check-In: FILL IN REGISTRATION SITE
Coaches must bring Travel permits (if outside STATE), signed medical liability release forms, approved roster lists, and player passes.

All games are played at:
INSERT VENUES HERE
Final Matches are played at VENUE HERE unless field conditions warrant moving the games. The Tournament will be played on FILL IN DATES HERE.

Coaches should bring player passes and medical release forms to every game.

A. TEAMS FROM THE UNITED STATES � For teams from the United States:
1. The Players must present picture identification cards issued by the team’s Federation Organization Member (USYS, AYSO, other)
2. Teams must provide proof of approval of the team’s participation from the team’s Federation Organization Member.
3. Teams from outside the State Association where the tournament is located must provide proof of permission to travel. Teams must be in good standing with their Federation Organization.

B. FOREIGN TEAMS For a team coming from a CONCACAF nation:
1. Players must present passports at registration or, if from a nation that the United States does not require a passport, proof of entry into the United States that is required by the United States.
2. Teams are required to have and present player picture identification cards.
3. Teams must have a completed form from its Provincial or National Association approving the team’s participation in the tournament.

Player Age and Eligibility
Boys and Girls teams in separate divisions
U-19 born after 7-31-86; U-18 born after 7-31-87; U-17 born after 7-31-88;
U-16 born after 7-31-89; U-15 born after 7-31-90; U-14 born after 7-31-91
U-13 born after 7-31-92; U-12 born after 7-31-93; U-11 born after 7-31-94;
U-10 born after 7-31-95; U-09 born after 7-31-96; U-08 born after 7-31-97

U-08 and U-10 teams will play an 8 v 8 format. U-11-19 age groups will play 11 v 11. Top division is the GOLD division. Lower division is known as RED.

Team rosters will be limited to 18 players for teams playing the 11 v 11 format. Team rosters will be limited to 14 players for teams playing the 8 v 8 format. The Roster submitted at Tournament Registration will be the official Roster for the Tournament and may not be altered. A player may only play for one team.

Four (4) guest players will be allowed per team. Guest player Rosters (yours or ours) should be validated by your state association/country federation (if required by your association). Prior to the start of each game the Field Marshal shall check that each team have the following; current Federation player and coaches passes, Medical Release Forms, and approved guest roster ( if applicable).

Teams
The first team listed in the tournament program (and website) is the home team. A maximum of 3 coaches are permitted on the coaches’ side of the field. All coaches will remain within 20 yards of the centerline on their half of the field, on the side opposite of both team’s spectators. Field marshals will communicate which side is the coaches’ side if questions arise. Spectators are not permitted behind the goals.

Player Credentials and Uniforms
1. Player picture identification cards are to be present and available at all matches.
2. Identification cards are required to be checked by the field marshal prior to each match
3. All shirt numbers of each player must be different.

Laws of the Game
All matches must be played in accordance with FIFA Laws of the Game in effect on January 1st of the year that the tournament is held, except as specifically modified for youth play by USSF and US Youth Soccer with certain Amendments as follows:

a. Substitution Time: Substitutes must be at the midfield line. Unlimited substitutions for all age groups will be allowed with the consent of the referee;
1. before a throw-in in your favor. The team in possession of the ball for a throw-in may substitute. If the team in possession of the ball for a throw-in substitutes players, the opposing team may substitute any number of players at the same time.
2. before a goal-kick.
3. after a score by either team.
4. at half time.
5. After an injury, by either team, when the referee stops play.
6. After a caution, one for one by both teams, if the cautioned player is substituted.
b. Match Lengths: Preliminary Games will consist of two halves of equal length.
– U-09 and U-10 play 25 minutes each half; – U-11 through U-14 play 30 minutes each half;
– U-15 through U-19 and adults will play 35 minutes each half.
Semi-Final and Final Games will consist of two halves of equal length.
– U-09 and U-10 play 2×25 minutes per half, with 2×5 minute overtime periods;
– U-11 and U-12 play 2×30 minutes per half, with 2×5 minute overtime periods;
– U-13 and U-14 play 2×35 minutes per half, with 2×5 minute overtime periods;
– U-15 and U-16 play 2×40 minutes per half, with 2×10 minute overtime periods;
– U-17 through Adults play 2×45 minutes per half, with 2×10 minute overtime periods;
The Directors reserve the right to adjust game length for conditions beyond their control. See Weather/Reschedule section below.
c. The game clock will not be stopped because of injury to any player, except if deemed necessary by the referee. Due to the time allowed for the completion of all games, the clock should run continuously.
d. It is the intent of the Tournament Development Event Invitational to provide a three person referee system for all tournament matches; however, if deemed necessary, matches may be conducted with club linesmen.
e. A coach may coach more than one team during the tournament.

Specific Laws of the Game
1. No overtime will be played during preliminary games.
2. Red cards will be administered as per FIFA laws of the game.
3. A player or coach sent off for a second caution will not be allowed to play for the remainder of that game and their next game.
4. Un-served Red cards and game report will be forwarded to their appropriate State or National organizations.

Game Balls
The Tournament will supply the game balls for all games. Balls used must be FIFA Approved.
The game ball size for U-09 through U-12 is Size 4 and the game ball size for U-13 and above is Size 5.

Player Equipment
1. Shin guards are mandatory and must be covered by a sock.
2. Shirt/jerseys will be tucked into players shorts at all times.
3. In the event of a color conflict, the home team (first team listed on schedule) will change color.
4. Hard casts are not permitted. Soft casts will only be allowed upon approval of the game referee.
5. The home team will be responsible for using an alternate color uniform if necessary.
6. The Tournament staff will provide an adidas Game ball for all matches

Tournament Format
For all age groups the Tournament format calls for three preliminary round games (round robin) with Semi and Final Matches in each division. Divisions with 6 teams will play their Final on Sunday PM. (Some divisions may have Quarter Final Matches depending on the number of teams in the division). Divisions with 5 teams will play 4 preliminary games and the top 2 teams in that group will play in the Finals.

A wild card team will not be assigned to play the winner of its own group in a quarter final or semi-final match. Example; if the wild card team comes from the A group the wild card won’t be scheduled to play the A group winner.

Match Schedules
Each team will play a minimum of 3 games. A maximum of 2 matches will be played on any one day.
Referees will be USSF certified.

Forfeits
Failure to complete a match, or a team leaving the field during play, will result in forfeiture. No team that has forfeited a game will be declared a group or wild card winner. The team winning by forfeit will be awarded the average number of goals they score in their other games, rounded down to the nearest integer, (with a minimum score of 1-0). The opponent’s score will be zero. This score will be the official score in case goal differential is necessary. The Tournament officials reserve the right to decide all matters concerning a forfeit. In no case will a team which has forfeited a game be declared a group winner or wild card. If a team arrives more than 15 minutes late for a match the Tournament Committee, at their discretion, may declare the game to be a forfeit depending upon the situation. A team failing to field the proper number of players at the scheduled time, or at any time during the match, will forfeit the game. 8v8 teams must field five (5) players. 11v11 teams must field seven (7) players. The scores of forfeit games in this manner will be scored as described above in this paragraph.

Procedures for Determining a Winner
Coaches and game referee will sign the game card certifying the final score which will then be delivered to the HQ tent at each site. Site scorer will be responsible for updating score board and website at: $WWW. Posted scores will reflect a maximum goal difference of 3. Bracket standings, leading to championship play, will be determined on the following basis:

Standings and Tie-breakers
No overtime periods will be played for Preliminary games. Each team will be awarded three points for a win, one point for a tie, and no points for a loss. In the event of ties in the group standing, the following procedure will determine the group winner:

1. Team with the most wins (if tied go to step 2).
2. Winner of the game played between the tied teams. (If three or more teams are tied for the group lead, Step 2 is by-passed, go to Step 3)
3. Highest number of total NET goals (goal differential). Maximum goal differential per game is three (3). (i.e. For a score of 4-1, goal differential is 3 for the winner and -3 for the loser. For a score of 6-2, goal differential is also 3 and -3 as above).
4. Fewer total goals allowed (gross).
5. Penalty kicks (FIFA laws of the game). If both teams advance, the Tournament Director will decide the opponents at the next level of play.

The selection of a wild card team, if required, shall be determined by:
1. Non-group winner with the most total points.
2. Non-group winner with the most wins.
3. Winner of the game, if applicable, played between the tied teams.
4. Goal Differential (See #3 in Standings Paragraph above)
5. Fewer total goals allowed (gross).
6. Penalty kicks (FIFA laws of the game, see definition below). If both teams advance, the Tournament Co-Director will decide the opponents at the next level of play.
(Placement of the Wild Card teams is at the discretion of the Tournament Committee)

Penalty Kick Elimination
When Semi-Final and Final matches are still tied after overtime (see overtime times in the Laws of the Game above) the FIFA laws of the game for Penalty Kicks apply. Only players on the field at the end of the second overtime period are eligible for penalty kicks. Coin flip will determine who will go first (visiting team calls). Five penalty kickers per team. The most goals scored after five kicks for each team wins the game. If the score remains tied, teams will alternate shooters until there is an unmatched goal between the teams. After all eligible players on the field of play have taken kicks; teams will start with their first kickers again and in the same order.

Games interrupted in the first half:
1) If the first half has not been completed and the game is stopped, every effort will be made to complete the game, or play to completion of at least the first half and record the score as final.
2) Games shall be considered completed if the first half has concluded. The score at the stoppage of play will be the final game score.

Games interrupted after the completion of the first half:
Will continue if time permits or, if time or other issues, as determined by the tournament, does not permit the game to continue, the current score at the time when the game is terminated will be the final score.
Note: if necessary, game lengths may be shortened to accommodate scheduling requirements. It is the responsibility of each coach to check Tournament Headquarters for any reschedule information.
For more information regarding schedule changes consult the website at $WWW

However, in the event that rescheduling is not possible, and game cancellation creates a situation where teams within the division are unable to play an equal number of qualifying games, the group winner will be determined on the basis of awarding the average tournament points earned in the other games, to the teams that were unable to complete an official game, followed by the tie breaking procedure if necessary. The team with the highest average points will be declared the winner of the group. In the event there is a tie which cannot be resolved by point averaging, the advancing team will be determined by a coin toss, or penalty kicks, per FIFA as directed by the Tournament Directors.

Match and Score Reporting
Scores will be posted as quickly as possible. Coaches should report any discrepancies to Headquarters prior to their next game. If wild cards need to be determined, coaches need to report their score immediately after their Sunday morning games. Wild cards will be determined at the site as indicated on that division’s schedule.

Protests and Disputes
Protests must be presented in writing to the tournament site Headquarters (one will be located at each site) within 30 minutes of completion of the game and must be accompanied by a fee of $100 in cash. Referee judgment will NOT be a basis for protest. Coaches wishing to file a protest shall notify the referee of this intention as soon as possible but not later than 5 minutes after the conclusion of the game in question. The Protest Committee’s decision is final.

Standards of Conduct and Discipline
Disciplinary action taken against a coach will be levied in the next game in which he/she coaches the team playing at the time of the original infraction, or to the next game coached if the violation occurred during the last game for that team. If additional behavior problems occur, the Directors reserve the right to levy additional discipline up to and including expulsion from the Tournament.

a. All participants in the Tournament Development Event Invitational will be expected to maintain high standards of conduct during their stay in the Dayton area. These standards are expected of players, referees, and other guests in the hotels and motels; keeping noise in the hallways to a minimum, refraining from kicking soccer balls inside any of the buildings, and being respectful of the property of others. Should it come to the attention of the Tournament Directors that a person (or persons) has failed to observe these guidelines; the Director reserves the right to take remedial action. Said action, depending upon the circumstances, may range from a warning, a reduction in points in the standings, or banning that team and/or all teams in its club from future participation in the tournament.

b. There shall be no dissent between players and/or coaches and the referee. Questioning a referee is considered dissent. All coaches are responsible for the actions of his or her spectators, specifically verbal abuse of referees. Such abuse will not be tolerated! Violation may result in forfeiture of the game and/or expulsion from further play.

c. Any player or coach ejected from a game will be ineligible to participate in the next scheduled game (a minimum of one game suspension depending upon the severity of the offense). The player/coach pass is to be turned in to the referee headquarters immediately following the initial suspension game. If dismissed in the last game, card will be returned to the appropriate state association.

d. Any player or coach who receives an accumulation of three (3) yellow cards must sit out the next game.

e. All coaches will remain within 20 yards of the centerline on their half of the field, on the side opposite of both team’s spectators.

f. Spectators may be ejected from the park for improper conduct, at the discretion of the tournament officials. Artificial noise makers are not permitted.

g. If field condition is such that there is a problem with interference by an outside agent; such as a tree overhanging the field for instance, the play will be restarted with a drop ball. Fields # 3, 6, 8 at Cloud Park may have some interference from trees. If the ball hits the trees and goes directly out of touch the play will resume with a throw-in.

h. Not permitted at our tournament includes: alcoholic beverages, smoking, and verbal abuse.

i. PETS are allowed at the Cloud Park Tournament Site ONLY as stipulated in the Montgomery County Park Rules.

Persons ejected due to any of the above situations must leave the site immediately.

Report of Disciplinary action taken against any team will be reported to that team’s provincial or:
A. For United States teams, the procedure for notifying the Federation Organization Member of that team of disciplinary action taken or required will be followed.
B. For CONCACAF teams, the tournament committee will notify the US Soccer Federation guidelines of disciplinary action taken, and that the Federation will transmit national association.

Awards
All U-09 through U-19 will receive first and second place team and individual trophies will be awarded in each Division winner and runner-up after the final game at the Finals site.

Inclement Weather Procedures
The Tournament Committee and/or Director reserve the right to delay the start of a game, reduce the length of the game, or terminate a game. All teams must abide by the tournament weather/field conditions policy. Head coaches only may come to the Tournament HQ only after the weather delay for further information.

Cancellations
If the Tournament is cancelled due to events beyond the control of the Tournament Committee, the Tournament will not be required to make any financial remuneration.

Waiver
By entering this tournament, every participant agrees to accept the jurisdiction of the Tournament Committee or its members, the Soccer Club, its Board of Trustees and employees, the four sites including Cloud Park-Ankeney Complex-NCR Old River-Englewood Complex and their respective employees, the United States Soccer Federation, United States Youth Soccer Association, and United States Youth Soccer Association North in all matters of dispute. No official, coach, club, league, referee, player or their representative may invoke the aid of the Courts of any political or governmental entity without first exhausting all available remedies within the appropriate affiliated soccer organizations as set forth in these rules, the Constitution and Bylaws of the Warrior Soccer Club, the Constitution and Bylaws of the United States Soccer Federation, the Constitution and Bylaws of the United States Youth Soccer Association, and the Constitution and Bylaws of the Ohio South Youth Soccer Association. For violation of this rule, the offending party shall be subject for all expenses incurred by these associations and/or their officers, as appropriate, in defending each court action, including, but not limited to, court costs, attorney(s) fees and reasonable compensation for all time and expenses.

General
1. Coaches are required to bring player cards and medical release forms to every game.
2. If a game is temporarily suspended due to weather problems, field conditions, or other situations beyond the tournament’s control, each team (coach) involved must check with their site’s tournament headquarters. Have players go their cars during a weather delay. No one will be allowed on the fields until the weather conditions are favorable to resume.
3. The tournament director’s interpretation of the foregoing rules/regulations shall be final.
4. The tournament director(s) reserves the right to decide on all matters pertaining to the Tournament Development Event Invitational

PayPal Account

The TourneyCentral TournamentTrak™ supports the PayPal system for credit cards. We recommend that you set up a PayPal account specifically to handle credit card transactions for your tournament.

To access the ability to use PayPal you must first setup a PayPal account at

You will be able to turn the system on or off for PayPal for team fees and other items. Many tournaments don’t wish to pay the transaction fees for applications OR only want to accept credit card payments on applications past the deadline. You have this flexibility.

If the Other Items is checked, you will be able to accept credit card payments for shirts and apparel, books, workshops, clinics, etc.

If you do not have a PayPal Account entered, you will not be able to select the choices on the next line until you have entered your account and updated your variables.

General Email Broadcast Guides

1. Separate topics with headers in ALL CAPS, followed by a return. Then place the direct URL, with link, on a sparate line after the copy. DO NOT PLACE A (.) AFTER THE URL.

Example:

2. Be short and specific.
3. Use action words: Go, Do, See, Visit, Apply, etc.
4. Keep the number of announcement paragraphs short and send messages more frequently.
5. Tailor your announcements to your audience. Coaches vs general messages. In your coaches’ version, encourage them to encourage the parents/grandparents to use the site. In your general audience message, speak directly to them.
6. Start broadcasting every other day at least two weeks out. Broadcasts will increase your site traffic 3-10x from the previous day, depending on the message.
7. Plug your sponsors shamelessly! If your sponsors are running a deal, link DIRECTLY to the deal and they will get lots of traffic.
8. Spelling. You would think that people have better things to do than correct your typos, but you would be sorely mistaken. Make sure you have no typos BEFORE you send out the email.
9. Link DIRECTLY to the page you are referring to in your announcement. Don’t just send the visitor to your home page.
10. Have your DURING EVENT and AFTER EVENT announcements pre-written. You will be too busy and tired to think about a meaningful message. We produce a bunch of traffic ALL DAY and nothing says “stale news” like last night’s “Thank You” when you want to say this morning’s “Welcome” Typical traffic bubbles are; Early morning (5:00am til about 9:00) then again at 11:00-2:00 and again starting about 5:00 and going until 1:00am, Sunday early afternoon starts a lot of traffic and the evening of your last day is your big traffic day.

A typical announcement cycle: Customize for your own event. Some of the annoucements are repeated, but said differently to appear fresh. Also, place the more urgent announcements at the top of the email.

Be sure to have a message ready to go when the tournament has concluded. Really, this little thing WILL set you apart from the pack.

What if my tournament cancels, what do I owe?

This really depends on when the tournament cancels and why.

Each event is billed TWO invoices; an initial COMMITMENT FEE and a PRODUCTION FEE. The PRODUCTION FEE is the total number of participating teams at the billing rate, minus the COMMITMENT FEE. We use the final participating teams as a basis for invoicing as that number is the most convenient and tangible for calculating costs.

Special cancellation rule due to lack of interest in a FIRST YEAR tournament only
About half the time, a first-year tournament will cancel due to lack of interest. It is hard these days to get a tournament off the ground. We know that and will take the risk with you if you show good faith. We also ask that you estimate your final teams low, so that your first invoice will not exceed your final team count.

If you end up canceling but have not accepted or scheduled teams, we will not invoice for the final amount. If you want to try again next year and make a good faith effort to get your event off the ground (i.e., sanction, market, etc) we will roll your commitment fee invoice into the next year. (If you decide to call it quits, your commitment fee invoice payment is used to cover our work to date on setting your event up, etc.) If your second year is unsuccessful, we’ll use your commitment fee invoice payment to cover our work and start the invoicing anew.

Cancellation due to weather, sudden field loss, protests, pandemic, acts of war/insurrection, acts of nature, etc.
You can plan pretty much everything except the weather and other acts of nature. We really hate to see a tournament come together nicely and be cancelled at the last minute, either in whole or in part. But it happens and the question of who owes who what and why comes into play.

The TourneyCentral site is an entire system designed to communicate quickly with your teams, not just a scheduling program, even though that may be the most visible part. The games are just the very last activity in a very long process. When disaster strikes, it enables you to keep your teams informed and your event fully marketed offline and online. The commitment fee we bill and base on the projected or past accepted teams covers this portion of the total fee and is non-refundable should your event cancel for any reason, including acts of nature.

As a general rule, once the teams have been accepted and scheduled and we have cut an invoice covering the final count, it becomes due and payable, regardless of whether or not the tournament has to cancel or truncate any part of the event. If this presents an exceptional hardship, call us; we’ll work with you.

We recommend you get event coverage insurance and that coverage includes TourneyCentral invoices.

What is a billable “accepted” participating team?

We’ve struggled with a precise definition of this for years but always come up short. For the lawyers and accountants, the definition below will have to suffice, even though it is imprecise.

A billable, accepted team is one that is participating in the tournament that has been accepted or scheduled into the tournament, regardless of whether or not the team is a host club team playing for free or been comped to fill a bracket or ends up forfeiting or withdrawing.

We also settle to the net number of teams, so if an accepted team withdraws but is filled with another team, we don’t invoice for two teams, even though by definition above, that is two accepted teams.

We’re not bean-counters here so it is not uncommon for one or two teams to slip in every now and again after we cut your final invoice. But we don’t like to be “bean-counted.”

It might be a bit old-fashioned in today’s data-driven world, but we view our relationship as a long-term partnership where the overall net is a win-win for everyone.

Add forms for sponsors/advertisers

1. Select the Upload Materials for Sponsors from the Action Menu
Screen Shot 2014-03-17 at 12.15.08 PM

2. Enter the basic information, leaving the link field blank if it is a pdf. If it is HTML, put the full link in.
Screen Shot 2014-03-17 at 12.14.37 PM

3. Once you hit add, you can then upload the PDF. If you have multiple forms, you may find it easier to enter all the basic information about the form first and then upload each.
Screen Shot 2014-03-17 at 12.20.45 PM

4. The forms will then be available for download by your sponsors on the public page.
Screen Shot 2014-03-17 at 12.22.29 PM

Additional features to build the complete Sponsors page are:
Advertising Products
Editing the Sponsor Page copy
Add a Sponsor
Add a Sponsor Logo (only Major Sponsors with logos attached will appear on the page)

As with anything, give this a five-minute try. There is a lot here and we’re here to help set this page up for you if needed.